Physical Gift Cards – Set the Shipping Price

Note: Physical Gift Cards are a feature only available in the PW Gift Cards Pro version.

You can use Shipping Classes to set a specific price (or even free shipping) for the physical gift card product.

1. Create a Shipping Class
From the WordPress dashboard, go to WooCommerce > Settings > Shipping > Shipping Classes > Add Shipping Class. Call it “Gift Card Shipping” or whatever you like.

2. Assign the new Shipping Class to your Product
Edit the Physical Gift Card product and set the Shipping class by going to Products > Physical Gift Card > Shipping > Shipping Class and assigning the “Gift Card Shipping” shipping class to it. Update the product (if you go back to the admin page WooCommerce > Settings > Shipping > Shipping Classes, you should now see a “1” under “Product Count”).

3. Set up a Flat Rate based on Shipping Class
Go to WooCommerce > Settings > Shipping > Shipping Zones. In each zone you should have at least 1 Flat Rate. Edit each Flat Rate, and make sure:

Cost is $0 (or whatever you want to charge for the physical gift card shipping)
“Gift Card Shipping” (or whatever you called the custom shipping class) class cost is $0
“No shipping class” cost is whatever it would be for other products
“Charge per class” is enabled

Change QR Code URL

Note: this feature requires PW Gift Cards Pro v1.448 or later.

By default, the QR Code uses the same URL as the “Redeem” button in the email. When it is scanned, it will take the user to your store with the gift card number applied to the cart just like clicking the Redeem button in the email.

To change the URL just for the QR code, follow these steps:

1. Install the free Code Snippets plugin: https://wordpress.org/plugins/code-snippets/
2. Create a new Snippet with the following code. Note: if you prefer, add the code to your functions.php rather than using Code Snippets.

add_filter( 'pwgc_qr_code_url', 'custom_pwgc_qr_code_url', 10, 3 );
function custom_pwgc_qr_code_url( $url, $gift_card_number, $design_id ) {
    // Change $url to something before returning it.
    return $url;
}
Example 1: Scanning QR Code will open the Check Balance page.
add_filter( 'pwgc_qr_code_url', 'custom_pwgc_qr_code_url', 10, 3 );
function custom_pwgc_qr_code_url( $url, $gift_card_number, $design_id ) {
    // Scanning QR Code will open the Check Balance page with the gift card number.
    $url = get_permalink( pwgc_get_balance_page() );
    $url = add_query_arg( 'card_number', $gift_card_number, $url );

    return $url;
}
Example 2: Scanning QR Code will open the gift card in the WP Admin Check Balance area.
add_filter( 'pwgc_qr_code_url', 'custom_pwgc_qr_code_url', 10, 3 );
function custom_pwgc_qr_code_url( $url, $gift_card_number, $design_id ) {
    // Scanning QR Code will open the gift card in the WP Admin Check Balance area.
    $url = pwgc_admin_url( 'balances', array( 'card_number' => $gift_card_number ) );

    return $url;
}
Example 3: Scanning QR Code will route to a specific website:
add_filter( 'pwgc_qr_code_url', 'custom_pwgc_qr_code_url', 10, 3 );
function custom_pwgc_qr_code_url( $url, $gift_card_number, $design_id ) {
    // Scanning QR Code will route to a specific website:
    $url = add_query_arg( 'gift_card_number', $gift_card_number, 'https://www.example.com/page.html' );

    return $url;
}

Prevent redeeming a gift card via the URL

When a gift card email is received, there is a Redeem button which contains a URL with the gift card. When a customer clicks on the button, it will automatically apply the gift card to the cart.

If you do not want to allow a gift card to be applied to the cart via URL, perform the following steps:

1. Install the free Code Snippets plugin: https://wordpress.org/plugins/code-snippets/
2. Create a new Snippet with the following code:

add_filter( 'pwgc_allow_applying_by_url', '__return_false' );

Note: if you prefer, add the code to your functions.php rather than using Code Snippets.

Rounding

Note: this feature requires PW Bulk Edit Pro version 2.316 or later.

When adjusting decimal values you can choose to round the results in different ways.

Standard Rounding
Will round up or down, depending on the value. For example, with a precision of 0 (zero): 4.49 becomes 4 and 4.5 becomes 5.

Round up to integer
Will always round up. 4.49 becomes 5 and 4.01 becomes 5.

Round down to integer
Will always round down. 4.49 becomes 4 and 4.01 becomes 4.

If you want to round to a specific amount (.99, .95, etc) you can follow the steps in this guide:
https://www.pimwick.com/pw-faq/round-prices-to-specific-cents-99-95-etc/

Hide the Apply Gift Card field for certain roles

For example, if you have a “wholesale” role and do not want to show the Apply Gift Card field you can add this code.

1. Download the free Code Snippets plugin: https://wordpress.org/plugins/code-snippets/
2. Create a Snippet with the following code (or you can add this to your Child Theme’s functions.php if you prefer):

add_action( 'woocommerce_init', 'pwgc_woocommerce_init', 11 );
function pwgc_woocommerce_init() {
    global $pw_gift_cards_redeeming;

    // List of roles who should not see the "Apply Gift Card" form.
    $hidden_for_these_roles = array(
        'wholesale',
        'another_role',
    );

    $hide = false;
    if ( is_user_logged_in() ) {
        $user = wp_get_current_user();
        $user_roles = (array) $user->roles;

        foreach ( $user_roles as $role ) {
            if ( in_array( $role, $hidden_for_these_roles ) ) {
                $hide = true;
                break;
            }
        }
    }

    if ( $hide ) {
        remove_action( 'woocommerce_proceed_to_checkout', array( $pw_gift_cards_redeeming, 'woocommerce_proceed_to_checkout' ) );
        remove_action( 'woocommerce_after_cart_contents', array( $pw_gift_cards_redeeming, 'woocommerce_after_cart_contents' ) );
        remove_action( 'woocommerce_before_checkout_form', array( $pw_gift_cards_redeeming, 'woocommerce_before_checkout_form' ), 40 );
        remove_action( 'woocommerce_review_order_before_submit', array( $pw_gift_cards_redeeming, 'woocommerce_review_order_before_submit' ) );
    }
}

Refund a gift card

The gift card balance will be automatically refunded to the gift card when an order status changes to Cancelled, Refunded, or Failed.

For partial refunds, you need to manually apply the balance back to the gift card. To do this, click on the gift card number in the Order and then click the “Adjust Balance” button. Enter the amount that should be returned to the gift card. Manually adjusting a gift card balance requires the PW Gift Cards Pro version.

Check Balance page – How to change the image

This requires the PW WooCommerce Gift Cards Pro version.

There is a hook available to change the logo for the Check Balance page to any image you would like.

1. Download the free Code Snippets plugin: https://wordpress.org/plugins/code-snippets/
2. Create a Snippet with the following code:

(You can optionally add this to your functions.php if you’re more familiar with that process instead.)

function custom_pwgc_check_balance_image( $icon ) {
    return '<img src="https://yoursite.com/path/to/image.png" height="200" width="200" style="margin: auto;" />';
}
add_filter( 'pwgc_check_balance_image', 'custom_pwgc_check_balance_image' );

If you need more control you can override the template for the Check Balance page. Follow the instructions found here:
https://www.pimwick.com/pw-faq/template-check-balance-page/

Rounding prices

You can round to the nearest .05 for example:

1. Download the free Code Snippets plugin: https://wordpress.org/plugins/code-snippets/
2. Create a Snippet with the following code:

(You can optionally add this to your functions.php if you’re more familiar with that process instead.)

function custom_pwbf_discounted_price( $price, $deal ) {
    if ( $deal->deal_type == 'percentage' ) {
        $price = round( $price / 0.05 ) * 0.05;
    }

    return $price;
}
add_filter( 'pwbf_discounted_price', 'custom_pwbf_discounted_price', 10, 2 );

You can change 0.05 above to round to other values such as 0.5, 0.25, etc.

Exclude Out of Stock Products from a sale

This requires the PW On Sale! Pro version.

1. Download the free Code Snippets plugin: https://wordpress.org/plugins/code-snippets/
2. Create a Snippet with the following code:

(You can optionally add this to your functions.php if you’re more familiar with that process instead.)

function custom_pwos_product_include_in_sale( $product_included, $product, $sale ) {
    if ( is_a( $product, 'WC_Product' ) && ! $product->is_in_stock() ) {
        $product_included = false;
    }

    return $product_included;
}
add_action( 'pwos_product_include_in_sale', 'custom_pwos_product_include_in_sale', 10, 3 );

Do not discount identical Products or Variations

Note: this requires the PW WooCommerce BOGO Pro version.

To prevent identical Products or Variations from triggering a BOGO, follow these steps.

Note: If you are more comfortable with editing your functions.php you can do that instead of Code Snippets.

1. Download the free Code Snippets plugin: https://wordpress.org/plugins/code-snippets/
2. Create a Snippet with the following code:

function pw_bogo_do_not_discount_identical_items( $cart_items ) {
    $cart_items_filtered = array();
    $products_in_cart = array();
    foreach ( $cart_items as $i ) {
        //
        // You can use 'variation_id' to only prevent identical Variations.
        //
        $id = $i['cart_item']['product_id'];

        if ( !in_array( $id, $products_in_cart ) ) {
            $cart_items_filtered[] = $i;
        }

        $products_in_cart[] = $id;
    }

    return $cart_items_filtered;
}
add_filter( 'pw_bogo_cart_items', 'pw_bogo_do_not_discount_identical_items' );

You can change ‘product_id’ in the code above to ‘variation_id’ to prevent identical Variations instead.

Error: the uploaded file exceeds the upload_max_filesize directive in php.ini

The installation .zip file for the plugin is approximately 2 MB. Your website host configures the maximum upload size for files on the server. You can see this setting by logging into your WordPress admin area and going to WooCommerce > Status > Server Environment > Max Upload Size.

A small upload size limit will cause issues when uploading larger files like photos, plugins, themes, etc. We recommend 32MB or 64MB to ensure that you will not run into issues when uploading files.

Contact your website host and ask for the upload_max_filesize value to be increased.

There are also tutorials on the web where you can do this yourself. For example:
https://www.wpbeginner.com/wp-tutorials/how-to-increase-the-maximum-file-upload-size-in-wordpress/

Use the existing “Apply Coupon” field for gift cards

To accept gift card numbers in the existing Apply Coupon field, follow these steps:

  1. Log into your WordPress admin area.
  2. Click on Pimwick Plugins > PW Gift Cards > Settings
  3. Check the box “Coupon Code Field Input”
  4. Optionally change the Redeem Location fields to “Do not display” so that only the Apply Coupon field exists
  5. Click on Save Settings

Hide the meta data (To / From / Message)

If you do not want the meta data to display in the Cart and Order pages (including the Order email), follow these steps:

1. Download the free Code Snippets plugin: https://wordpress.org/plugins/code-snippets/
2. Create a Snippet with the following code:

Note: You can optionally add this to your functions.php if you’re more familiar with that process instead of using Code Snippets.

function hide_gc_meta_data() {
	global $pw_gift_cards_purchasing;

	remove_filter( 'woocommerce_get_item_data', array( $pw_gift_cards_purchasing, 'woocommerce_get_item_data' ), 10, 2 );
}
add_action( 'woocommerce_init', 'hide_gc_meta_data', 99 );

function hide_gc_woocommerce_display_item_meta( $html, $item, $args ) {
	if ( is_a( $item, 'WC_Order_Item_Product' ) ) {
		$product = wc_get_product( $item->get_product_id() );

		if ( is_a( $product, 'WC_Product_PW_Gift_Card' ) ) {
			return '';
		}
	}

	return $html;
}
add_filter( 'woocommerce_display_item_meta', 'hide_gc_woocommerce_display_item_meta', 99, 3 );

Set the Expiration Date to a fixed value

Gift Card expiration dates are available only in the PW Gift Cards Pro version.

To set the Expiration Date to a fixed value, follow these steps:

1. Download the free Code Snippets plugin: https://wordpress.org/plugins/code-snippets/
2. Create a Snippet with the following code:

Note: You can optionally add this to your functions.php if you’re more familiar with that process instead of using Code Snippets.

function custom_pwgc_generated_expiration_date( $expiration_date, $gift_card, $order_item_id, $credit_amount, $product ) {
	$expiration_date = '2023-12-31';

	return $expiration_date;
}
add_filter( 'pwgc_generated_expiration_date', 'custom_pwgc_generated_expiration_date', 10, 5 );
Change 2023-12-31 to your desired expiration date.

You can set $expiration_date to any valid string that strtotime() can parse. For example:

End of the current calendar year:
$expiration_date = date( 'Y' ) . '-12-31';
Next Saturday:
$expiration_date = 'next Saturday';

Change PDF page size (A4, Legal, etc)

The PDF module is available in the PW Gift Cards Pro version only.

For example, to set the PDF to be A4, follow these steps:

1. Download the free Code Snippets plugin: https://wordpress.org/plugins/code-snippets/
2. Create a Snippet with the following code:

Note: You can optionally add this to your functions.php if you’re more familiar with that process instead of using Code Snippets.

function custom_pwgc_mpdf_config( $config ) {
    $config['format'] = 'A4';
    return $config;
}
add_filter( 'pwgc_mpdf_config', 'custom_pwgc_mpdf_config' );
Accepted values for the Format setting are:
  • ‘A4’, ‘Letter’, ‘Legal’, etc
  • ‘A4-L’, ‘Letter-L’, ‘Legal-L’, etc for landscape
  • A string of 2 dimensions e.g. ’21cm 29.7cm’ Can be px, pt, in, mm, cm: but not em, ex or %

REST API

The PW Gift Cards Pro version includes a full REST API to support programmatically managing the gift card system.

For details, see this page:

https://www.pimwick.com/pw-woocommerce-gift-cards-rest-api-documentation/

Enabled Linked Products to bulk edit Upsells and Cross-sells

To enable Linked Products to bulk edit Upsells and Cross-sells, follow these steps:

Note: this feature requires PW Bulk Edit Pro.

1. Log into your WordPress admin area.
2. Click on WooCommerce > Settings > PW Bulk Edit
3. Check the box that says “Linked Products”
4. Click on Save Changes

Manually create a gift card

If you have PW Gift Cards Pro you can manually create a gift card from the admin area by going to Pimwick Plugins > PW Gift Cards > Create Gift Card.

Without the Pro version the easiest way to send a gift card to a customer is to first create a WooCommerce Coupon that only you will use. Set the coupon to be 100% off the cart.

Then simply order a gift card through the front end and specify the To email address for the recipient. Apply your coupon code during checkout so that you don’t have to actually pay anything.

Round prices to specific cents (.99, .95, etc)

Note: this feature requires PW Bulk Edit Pro version 2.316 or later.

In two steps you can change all of your prices to have the same ending amount (.99, .95, .etc).

Step 1 – Round everything down
  1. Filter the products in the bulk editor.
  2. Click the price column header.
  3. Click on Edit All Checked Products.
  4. Select Increase By Percentage.
  5. Select Round Down To Integer.
  6. Click on Apply.

Step 2 – Add the cents amount
  1. Filter the products in the bulk editor.
  2. Click the price column header.
  3. Click on Edit All Checked Products.
  4. Select Increase By Specific Amount.
  5. Input the cents (for example: .99 or .95).
  6. Click on Apply.

CSV Export – Add quotes around all fields

During the CSV export you can instruct Let’s Export! to wrap all values with double-quotes. By default, only string values will be wrapped.

1. Log into your FTP site and edit wp-config.php
2. Edit wp-config.php and scroll to the end and add the following bit of code:

Scroll towards the bottom, and before the line that says “Happy blogging.” add this code ABOVE that line:

define( 'PW_LETS_EXPORT_USE_FPUTCSV', false );

/* That's all, stop editing! Happy blogging. */

3. Save the wp-config.php file and re-upload it to your server.

Hide the “Email Design” key in the email, Cart, Checkout, and Order pages

To hide the “Email Design” meta value, perform the following steps:

1. Log into your FTP site and edit wp-config.php
2. Edit wp-config.php and scroll to the end and add the following bit of code:

Scroll towards the bottom, and before the line that says “Happy blogging.” add this code ABOVE that line:

define( 'PWGC_EMAIL_DESIGN_ID_META_KEY', '_pw_gift_card_email_design_id' );
define( 'PWGC_HIDE_DESIGN_META_IN_CART', true );

/* That's all, stop editing! Happy blogging. */

3. Save the wp-config.php file and re-upload it to your server.

Hide the “Gift Card Applied” notice for zero balance cards

When a gift card has a zero balance and it is added to the cart, there will be two messages displayed:

“Gift Card Applied”

“This gift card has a zero balance”

You can prevent the “Gift Card Applied” message from appearing by following these steps:

1. Download the free Code Snippets plugin: https://wordpress.org/plugins/code-snippets/
2. Create a Snippet with the following code (Note: If you are more comfortable with editing your functions.php you can do that instead of Code Snippets.):

function custom_pwgc_show_gift_card_applied_message( $show, $gift_card ) {
    if ( $gift_card->get_balance() > 0 ) {
        return true;
    } else {
        return false;
    }
}
add_filter( 'pwgc_show_gift_card_applied_message', 'custom_pwgc_show_gift_card_applied_message', 10, 2 );

Calculated Fields

Calculated fields are read-only and can be used to display information that is helpful when bulk editing products. Follow these instructions to add a calculated field to the Bulk Editor:

1. Download the free Code Snippets plugin: https://wordpress.org/plugins/code-snippets/
2. Create a Snippet with the following code (Note: If you are more comfortable with editing your functions.php you can do that instead of Code Snippets.):

function pwbe_product_columns_atum_inbound_stock( $columns ) {
    $columns[] = array(
        'name' => 'Calculated Field',
        'type' => 'text',
        'table' => 'calculated',
        'field' => 'example_calculated_field',
        'visibility' => 'both',
        'readonly' => true,
        'sortable' => 'false'
    );

    return $columns;
}
function pwbe_results_product_atum_inbound_stock( $pwbe_product, $column ) {
    if ( $column['field'] == 'example_calculated_field' ) {

        // Display regular price with a 10% increase.
        $result = $pwbe_product->_regular_price * 1.10;

        $pwbe_product->example_calculated_field = $result;
    }

    return $pwbe_product;
}
add_filter( 'pwbe_product_columns', 'pwbe_product_columns_atum_inbound_stock' );
add_filter( 'pwbe_results_product', 'pwbe_results_product_atum_inbound_stock', 10, 2 );

Example: ATUM Inbound Stock
If you use the ATUM Inventory Stock Management plugin, you can add the Inbound Stock calculated field using the following snippet:

function pwbe_product_columns_atum_inbound_stock( $columns ) {
    $columns[] = array(
        'name' => 'Inbound Stock',
        'type' => 'text',
        'table' => 'calculated',
        'field' => 'atum_inbound_stock',
        'visibility' => 'both',
        'readonly' => true,
        'sortable' => 'false'
    );

    return $columns;
}
function pwbe_results_product_atum_inbound_stock( $pwbe_product, $column ) {
    if ( $column['field'] == 'atum_inbound_stock' ) {
        $atum_product = \Atum\Inc\Helpers::get_atum_product( $pwbe_product->post_id );
        $inbound_stock = $atum_product->get_inbound_stock();

        $pwbe_product->atum_inbound_stock = $inbound_stock;
    }

    return $pwbe_product;
}
add_filter( 'pwbe_product_columns', 'pwbe_product_columns_atum_inbound_stock' );
add_filter( 'pwbe_results_product', 'pwbe_results_product_atum_inbound_stock', 10, 2 );

Change the Role required for using the bulk editor

By default, the bulk editor requires the “manage_woocommerce” capability which is included in the “Shop Manager” role. You can alter this in your wp-config.php file if you would like to create a separate capability for the store managers.

They would still access the WordPress back end however since they don’t have the “Shop Manager” role they won’t be able to make any other changes.

Follow these steps to switch the required capability for the bulk editor:

1. Log into your FTP site and edit wp-config.php
2. Edit wp-config.php and scroll to the end and add the following bit of code:

Scroll towards the bottom, and before the line that says “Happy blogging.” add this code ABOVE that line:

define( 'PWBE_REQUIRES_CAPABILITY', 'manage_woocommerce' );

/* That's all, stop editing! Happy blogging. */

3. Save the wp-config.php file and re-upload it to your server.

Change the “manage_woocommerce” value to the privilege you created for the store managers.

Bulk Edit Product Image

Bulk editing the product image requires the PW WooCommerce Bulk Edit Pro version.

The “Image” column will appear as the first column. You can use this to set the featured product image for the main product as well as the image for individual Variations.

Increase the max row limit

Due to server and browser resource limitations, by default 1,000 rows are returned at a time. This performs well for most systems.

If you need to increase or decrease this limit, you can change the setting by following these steps:

1. Log into your WordPress admin area.
2. Click on WooCommerce > Settings > PW Bulk Edit
3. Set the Row Limit value.

If you are going to increase the row limit, we recommend first creating a custom view so that only the data you need to see/edit will be processed.

Bulk Change Expiration Dates

Note: This requires PW WooCommerce Gift Cards Pro.

The wp_pimwick_gift_card table stores the expiration date for the gift cards. Use phpMyAdmin to run SQL scripts to mass update the expiration date in the database.


To set the expiration date to 1 year from the create date

First, run this preview query so you can make sure things look as expected:

SELECT *, DATE_ADD( create_date, INTERVAL 365 DAY) AS 'new_expiration_date' FROM wp_pimwick_gift_card;

This query will perform the update:

UPDATE wp_pimwick_gift_card SET expiration_date = DATE_ADD( create_date, INTERVAL 365 DAY);


To extend all expiration dates by 1 year.

First, run this preview query so you can make sure things look as expected:

SELECT *, DATE_ADD( expiration_date, INTERVAL 365 DAY) AS 'new_expiration_date' FROM wp_pimwick_gift_card;

This query will perform the update:

UPDATE wp_pimwick_gift_card SET expiration_date = DATE_ADD( expiration_date, INTERVAL 365 DAY);

Be sure to make a database backup before running any update queries.

Multiple BOGOs

By default, once a BOGO has been matched for products in the cart, no other BOGOs will apply. Follow these instructions to allow multiple BOGOs to work on the same product.

Note: If you are more comfortable with editing your functions.php you can do that instead of Code Snippets.

1. Download the free Code Snippets plugin: https://wordpress.org/plugins/code-snippets/
2. Create a Snippet with the following code:

function custom_pw_bogo_already_applied_cart_items( $cart_items ) {
    return array();
}
add_filter( 'pw_bogo_already_applied_cart_items', 'custom_pw_bogo_already_applied_cart_items' );

Error when viewing PDF on a SiteGround hosted store

If you are hosted by SiteGround and have issues when viewing PDF, their support team advises the following solution:

WordPress admin Dashboard > SiteGround Optimizer – Frontend Optimization > General section > Disable the “Minify the HTML Output” option.

Contact SiteGround support if you still have issues after making this modification.

Error: the uploaded file exceeds the upload_max_filesize directive in php.ini

The installation .zip file for the plugin is approximately 4 MB. Your website host configures the maximum upload size for files on the server. You can see this setting by logging into your WordPress admin area and going to WooCommerce > Status > Server Environment > Max Upload Size.

A small upload size limit will cause issues when uploading larger files like photos, plugins, themes, etc. We recommend 32MB or 64MB to ensure that you will not run into issues when uploading files.

Contact your website host and ask for the upload_max_filesize value to be increased.

There are also tutorials on the web where you can do this yourself. For example:
https://www.wpbeginner.com/wp-tutorials/how-to-increase-the-maximum-file-upload-size-in-wordpress/

Setting a SKU

You can provide a SKU for the amounts by following these steps:

  1. Log into your WordPress admin area.
  2. Click on the Products menu on the left.
  3. Edit the gift card product.
  4. Click the Variations tab.
  5. Expand the variations and set the SKU for each amount.
  6. Click the blue Update button to save the changes.

PDF-only Content

Note: this requires the PW Gift Cards Pro version.

If you want some text to appear only in the PDF version (for example, how to print and redeem in-store) you can use the template hooks to insert text at any location in the gift card. Follow these steps:

Note: If you are more comfortable adding the code to your functions.php you can do that instead of using Code Snippets.

1. Download the free Code Snippets plugin: https://wordpress.org/plugins/code-snippets/
2. Create a new Snippet with the following code:

add_action( 'pwgc_email_top', 'pw_gift_card_pdf_text' );
function pw_gift_card_pdf_text( $item_data ) {
    if ( $item_data->is_pdf ) {
        ?>
        <p>
            Output the custom text for PDF version.
        </p>
        <?php
    }
}


The following locations are available, just change it in the first line above:

  • pwgc_email_top
  • pwgc_email_before_recipient
  • pwgc_email_before_from
  • pwgc_email_before_message
  • pwgc_email_before_gift_card
  • pwgc_email_inside_gift_card_top
  • pwgc_email_inside_gift_card_bottom
  • pwgc_email_after_gift_card
  • pwgc_email_bottom

Background image for gift card email

Note: This requires the PW Gift Cards Pro version.

You can set a background image for the gift card email by following these steps:

1. Log into your WordPress admin area.
2. Click on Pimwick Plugins > PW Gift Cards > Email Designer
3. Add the following to the “Custom CSS” field:

body {
    background-image: url("https://yoursite.com/path/to/the/image.png");
}

body.wp-admin {
    background-image: initial;
}

#wrapper {
    background-color: initial;
}

Reply to Buyer in the Gift Card Email

When a customer receives a gift card email, the “Reply-to” for the email will be your store’s configured email address by default. If you instead want the recipient customer to reply to the purchasing customer, you can set the Billing Email, First Name, and Last Name in the “Reply-to” field for the gift card emails.

Note: If you are more comfortable adding the code to your functions.php you can do that instead of using Code Snippets.

1. Download the free Code Snippets plugin: https://wordpress.org/plugins/code-snippets/
2. Create a new Snippet with the following code:

add_filter( 'woocommerce_email_headers', 'pwgc_reply_to_buyer', 1, 4 );
function pwgc_reply_to_buyer( $header, $email_id, $gift_card, $email ) {
    // Only for "PW Gift Card" email notification
    if ('pwgc_email' !== $email_id ) {
        return $header;
    }

    $order = is_a( $gift_card, 'PW_Gift_Card_Item_Data' ) ? $gift_card->order : false;
    if ( is_a( $order, 'WC_Order' ) ) {
        $reply_to_name  = $order->get_billing_first_name() . ' ' . $order->get_billing_last_name();
        $reply_to_email = $order->get_billing_email();

        $header  = 'Content-Type: ' . $email->get_content_type() . "\r\n";
        $header .= 'Reply-to: ' . $reply_to_name . ' <' . $reply_to_email . ">\r\n";
    }

    return $header;
}

Installation

Note: You will not lose any data or customizations when uninstalling the free version.

Follow these steps to install your new plugin:

  1. Log into your WordPress admin area.
  2. Click on Plugins.
  3. If you have installed the free WordPress.org version of our plugin you must first uninstall it.
  4. Click on Add New
  5. Click on Upload
  6. Select the plugin .zip file to install it.

If you need help with the installation, contact us.

Installation

Note: You will not lose any data or customizations when uninstalling the free version.

Follow these steps to install your new plugin:

  1. Log into your WordPress admin area.
  2. Click on Plugins.
  3. If you have installed the free WordPress.org version of our plugin you must first uninstall it.
  4. Click on Add New
  5. Click on Upload
  6. Select the plugin .zip file to install it.

After installing the plugin, go to Pimwick Plugins > PW Gift Cards > Click the “Create Gift Card Product” button. This button will not appear once the product has been created. You can configure the gift card product under the Products menu on the left and change any global gift card settings by going to Pimwick Plugins > PW Gift Cards > Settings.

If you need help with the installation, contact us.

Installation

Note: You will not lose any data or customizations when uninstalling the free version.

Follow these steps to install your new plugin:

  1. Log into your WordPress admin area.
  2. Click on Plugins.
  3. If you have installed the free WordPress.org version of our plugin you must first uninstall it.
  4. Click on Add New
  5. Click on Upload
  6. Select the plugin .zip file to install it.

If you need help with the installation, contact us.

Hide the “Pimwick Plugins” menu

Follow these instructions to hide the Pimwick Plugins menu.

Note: this change can be made to your functions.php if you prefer that option.

1. Download the free Code Snippets plugin: https://wordpress.org/plugins/code-snippets/
2. Create a Snippet with the following code:

function remove_pimwick_plugins_menu( $columns ) {
    remove_menu_page( 'pimwick' );
}
add_action( 'admin_menu', 'remove_pimwick_plugins_menu', 99, 1 );

Let me know if you have any questions!

Hide the “Pimwick Plugins” menu

Latest Plugin Version

If you are running the latest version of the plugin, just follow these steps:

1. Go to Pimwick Plugins > PW Gift Cards > Settings
2. Check the box Hide the Pimwick Plugins menu
3. Click on Save changes.

You can now access the plugin via the WooCommerce > PW Gift Cards menu.


Older Versions

For older versions that do not have the setting referenced above, follow these instructions to hide the Pimwick Plugins menu.

Note: this change can be made to your functions.php if you prefer that option.

1. Download the free Code Snippets plugin: https://wordpress.org/plugins/code-snippets/
2. Create a Snippet with the following code:

function remove_pimwick_plugins_menu( $columns ) {
    remove_menu_page( 'pimwick' );
}
add_action( 'admin_menu', 'remove_pimwick_plugins_menu', 99, 1 );

Let me know if you have any questions!

Hide the “Pimwick Plugins” menu

Follow these instructions to hide the Pimwick Plugins menu.

Note: this change can be made to your functions.php if you prefer that option.

1. Download the free Code Snippets plugin: https://wordpress.org/plugins/code-snippets/
2. Create a Snippet with the following code:

function remove_pimwick_plugins_menu( $columns ) {
    remove_menu_page( 'pimwick' );
}
add_action( 'admin_menu', 'remove_pimwick_plugins_menu', 99, 1 );

Let me know if you have any questions!

Hide the “Pimwick Plugins” menu

Follow these instructions to hide the Pimwick Plugins menu.

Note: this change can be made to your functions.php if you prefer that option.

1. Download the free Code Snippets plugin: https://wordpress.org/plugins/code-snippets/
2. Create a Snippet with the following code:

function remove_pimwick_plugins_menu( $columns ) {
    remove_menu_page( 'pimwick' );
}
add_action( 'admin_menu', 'remove_pimwick_plugins_menu', 99, 1 );

Let me know if you have any questions!

500 Internal Server Error

A 500 error means that something on the server is throwing an error. This could be a conflict with another plugin or something else. We need to examine the log file from the server to find out more.

Could you perform the following steps please:

1. Log into your FTP site and edit wp-config.php
2. Set the following values (add the lines if they don’t exist):

    define( 'WP_DEBUG', true );
    define( 'WP_DEBUG_LOG', true );
    define( 'WP_DEBUG_DISPLAY', false );
    @ini_set( 'display_errors', 0 );

3. Return to the site and trigger the error again.
4. Now go back to FTP and send me the file /wp-content/debug.log
5. Return to wp-config.php and set DEBUG back to false (reverting the changes made in Step 2)

If you aren’t comfortable with performing the steps above, contact your website host and they should be able to assist you in locating this log file.

Gift Card emails not being sent or received

Verify that the gift card email is enabled inside of WooCommerce. Go to WooCommerce > Settings > Emails > PW Gift Card Email > Ensure that the “Enable / Disable” checkbox is checked.

Confirm that the Order Status is “Complete” for the gift cards purchased. You should see the Gift Card number along with the recipient email in the Order line items inside the admin area.

If the order is Complete and it shows the Gift Card number, you can try sending a test email by clicking on Pimwick Plugins -> PW Gift Cards -> Designer -> Send Preview Email.

If the email is not delivered, try disabling the WooCommerce Transactional Email System for the gift cards. Follow these steps:

1. Click on Pimwick Plugins -> PW Gift Cards -> Settings
2. Uncheck the box that says “Use WooCommerce Transactional Email System”
3. Click on “Save Changes”
4. Perform another test email to see if the gift card gets delivered.

If the order is Complete and it shows the Gift Card number, the emails are attempting to be sent using your email system. To independently verify this, you can log all outgoing emails using this free plugin:
https://wordpress.org/plugins/wp-mail-logging/

After installing the plugin, perform another test order. After the order is Complete and the gift card number has been generated, check the email log to see which emails were sent. You should see several, to the site admin and to the customer.

Also, check the Junk Mail folder for the recipient email address. If the gift card is not there, the email may have been sent but been outright rejected by the recipient’s email server (not even going to the Junk Mail folder).

Most email servers are very strict when it comes to attempting to prevent spam and may see the Gift Card email as possibly junk mail. As a result, most WooCommerce installations are not trusted by default, since anyone could send out spam from their server.

To combat this, we recommend using Pepipost (https://pepipost.com) to handle your email delivery. There is no cost (until you send more than 3,000 emails in a single month and even then, it’s pretty inexpensive for the service you get). They will ensure that your emails are delivered and you can even track open rate to know for sure that someone received their email and opened it.

Amazon’s Simple Email Service (SES) is also another viable option, although it is more difficult to get set up initially. You can learn more about it here: https://aws.amazon.com/ses/

Both Pepipost and Amazon SES integrate into WordPress easily with the WP Mail SMTP plugin (also free): https://wordpress.org/plugins/wp-mail-smtp/

We aren’t affiliated with Pepipost or Amazon SES.

To quickly test the gift card emails, click on Pimwick Plugins -> PW Gift Cards -> Designer -> Send Preview Email. If you get the gift card, try different email accounts (such as @gmail.com, @yahoo.com, etc) to verify that everything is working.

Hopefully this helps you gain some visibility into these types of emails, let us know if you have any other questions!

Hide the Preview button

Note: The Preview button is only available in PW Gift Cards Pro.

If you want to hide the Preview button you can do so from the product page in the admin area:

1. Log into your WordPress admin area.
2. Click on the Products menu on the left.
3. Edit the gift card product.
4. On the Gift Card tab, locate the “Show email preview” and uncheck it.

Change the example gift card number

Note: this requires the PW Gift Cards Pro version.

By default, the example gift card number shown in the preview is 1234-WXYZ-5678-ABCD. To change this to something else, follow these steps:

1. Download the free Code Snippets plugin: https://wordpress.org/plugins/code-snippets/
2. Create a Snippet with the following code (you can optionally add this to your functions.php if you’re more familiar with that process instead.)

function custom_pwgc_example_gift_card_number( $number ) {
    $number = '1234-WXYZ-5678-ABCD';
    
    return $number;
}
add_action( 'pwgc_example_gift_card_number', 'custom_pwgc_example_gift_card_number' );

Set the Expiration Date automatically

Gift Card expiration dates are available only in the PW Gift Cards Pro version.

You can have the system automatically set an expiration date for newly purchased cards by following these steps:

1. Log into your WordPress admin area
2. Click on the Products menu on the left
3. Edit the gift card product
4. On the “Gift Card” tab, look for the “Expires in X days” field

This will change the expiration date for new gift cards, however existing gift cards will not be affected. If you want to change all existing gift cards, see our guide here: Bulk Change Expiration Date

Disable the “auto focus” feature on the Other Amount option

By default, when the “Other Amount” value is chosen the amount input field will be automatically focused. To disable this feature, follow these steps:

1. Download the free Code Snippets plugin: https://wordpress.org/plugins/code-snippets/
2. Create a Snippet with the following code (you can optionally add this to your functions.php if you’re more familiar with that process instead.)

add_filter( 'pwgc_auto_focus_other_amount', '__return_false' );

Note: This requires PW WooCommerce Gift Cards Pro version 1.337 or later.

Hide the “View PDF” link on the frontend preview

Note: this requires the PW Gift Cards Pro version.

If you do not want to show the “View PDF” link when the purchasing customer previews the gift card email, follow these steps:

1. Download the free Code Snippets plugin: https://wordpress.org/plugins/code-snippets/
2. Create a Snippet with the following code (you can optionally add this to your functions.php if you’re more familiar with that process instead.)

function custom_pwgc_email_css( $item_data ) {
    if ( property_exists( $item_data, 'preview' ) && $item_data->preview === true && isset( $_REQUEST['pwgc'] ) ) {
        echo '#pwgc-email-pdf-link-container { display: none; }';
    }
}
add_action( 'pwgc_email_css', 'custom_pwgc_email_css' );

Change the Check Balance page URL

By default, the Check Balance page is located by finding the Page with the [pw_gift_cards_balance] shortcode. If you have more than one Page using this shortcode, you can specify the Check Balance page by taking the following steps:

1. Download the free Code Snippets plugin: https://wordpress.org/plugins/code-snippets/
2. Create a Snippet with the following code:

(You can optionally add this to your functions.php if you’re more familiar with that process instead.)

function custom_pwgc_balance_page( $page ) {
    // Change this ID to match the Page ID for the Check Balance page you would like to use.
    $new_page = get_post( 123 );

    if ( is_a( $new_page, 'WP_Post' ) ) {
        return $new_page;
    }

    return $page;
}
add_filter( 'pwgc_balance_page', 'custom_pwgc_balance_page' );

Currency Switchers / Converters

The PW Gift Cards plugin is compatible with the following currency converters:

Aelia Currency Switcher
https://aelia.co/shop/currency-switcher-woocommerce/

Currency Switcher for WooCommerce by WP Wham
https://wpfactory.com/item/currency-switcher-woocommerce-wordpress-plugin/

Multi-Currency for WooCommerce by TIV.NET INC
https://woocommerce.com/products/multi-currency/

Multi Currency for WooCommerce by VillaTheme
https://villatheme.com/extensions/woo-multi-currency/

Polylang + Hyyan WooCommerce Polylang Integration
https://wordpress.org/plugins/woo-poly-integration/

WooCommerce Currency Switcher by realmag777
https://wordpress.org/plugins/woocommerce-currency-switcher/

WooCommerce Price Based on Country by Oscar Gare
https://wordpress.org/plugins/woocommerce-product-price-based-on-countries/

WooCommerce Ultimate Multi Currency Suite by Dev49net
https://codecanyon.net/item/woocommerce-ultimate-multi-currency-suite/11997014

WPML Multicurrency by OnTheGoSystems
http://wpml.org/documentation/related-projects/woocommerce-multilingual/

The gift card is always kept in the store’s default currency. A customer can purchase a gift card in any currency and it will be converted to the store’s default currency. Likewise, a customer can redeem a gift card for any currency on the order, and the value is converted to the store’s default currency when calculating the gift card amount.

If you are using a different currency switcher we might be able to add integration. Send us a WooCommerce System Report and we can take a look. Click on WooCommerce -> Status -> Get System Report.

Installation

Note: You will not lose any data or customizations when uninstalling the free version.

Follow these steps to install your new plugin:

  1. Log into your WordPress admin area.
  2. Click on Plugins.
  3. If you have installed the free WordPress.org version of our plugin you must first uninstall it.
  4. Click on Add New
  5. Click on Upload
  6. Select the plugin .zip file to install it.

If you need help with the installation, contact us.

MySQL Error: Table ‘pwbe_variations’ doesn’t exist

This is an “Access denied” error. This occurs if the logged in database user does not have permission to create temporary tables in the WordPress database.

The bulk editor relies on temporary tables to handle some of the processing. You will need to contact your hosting provider to allow your WordPress database user to create temporary tables.

The privilege they need to grant you is:

CREATE TEMPORARY TABLES

See here for details: https://dev.mysql.com/doc/refman/5.7/en/privileges-provided.html

Let the customer print the gift card instead of emailing it

The purchasing customer can enter their own email address in the “To” field. They will receive the gift card email instead of the recipient and can deliver it however they would like.

If you are using the PW Gift Cards Pro version, the purchasing customer can click the “View PDF” link in the gift card email and print out the gift card.

Hide the “From” and “Message” fields

To remove the “From” and “Message” fields, follow these steps:

1. Download the free Code Snippets plugin: https://wordpress.org/plugins/code-snippets/
2. Create a Snippet with the following code (or add to your functions.php if you prefer):

add_action('wp_head', 'pwgc_head_remove_from');
function pwgc_head_remove_from() {
    ?>
    <style>
        #pwgc-form-message {
            display: none;
        }

        #pwgc-form-from {
            display: none;
        }
    </style>
    <?php
}

add_action( 'wp_footer', 'pwgc_footer_remove_from' );
function pwgc_footer_remove_from() {
    ?>
    <script>
        jQuery('#pwgc-from').attr('required', false);
    </script>
    <?php
}

If you have PW Gift Cards Pro and want to hide the “From” and “Message” fields on the Physical gift card product only, use this code instead:

add_action('wp_head', 'pwgc_head_remove_from');
function pwgc_head_remove_from() {
    global $post;

    // Remove the From and Message fields for physical gift cards.
    $product = property_exists( $post, 'ID' ) ? wc_get_product( $post->ID ) : false;
    if ( is_a( $product, 'WC_Product_PW_Gift_Card' ) && $product->get_pwgc_is_physical_card() ) {
        ?>
        <style>
            #pwgc-form-message {
                display: none;
            }

            #pwgc-form-from {
                display: none;
            }
        </style>
        <?php
    }
}

add_action( 'wp_footer', 'pwgc_footer_remove_from' );
function pwgc_footer_remove_from() {
    ?>
    <script>
        jQuery('#pwgc-from').attr('required', false);
    </script>
    <?php
}

Memory Limit

By default, the bulk edit plugin will set the memory limit to 1024M in order to allow the system to have enough memory to return the data. You can change this limit or disable this feature entirely.

1. Download the wp-config.php from your FTP server.
2. Keep a backup of wp-config.php in case there are problems.
3. Edit wp-config.php and scroll to the end and add the following bit of code:

Scroll towards the bottom, and before the line that says “Happy blogging.” add this code ABOVE that line:

define( 'PWBE_MEMORY_LIMIT', '1024M' );

/* That's all, stop editing! Happy blogging. */

4. Change the 1024M to a different value depending on your server environment.
5. Save the wp-config.php file and re-upload it to your server.

Prevent the memory limit from changing
If you do not want the plugin to alter the memory settings at all, set the value to false (without quotes):

define( 'PWBE_MEMORY_LIMIT', false );

Value-added Tax (VAT) for gift cards

VAT laws dictate that “single-purpose” gift cards should be taxed at the time of purchase since the gift card can only be used for a specific product. The tax can be correctly calculated at the time of purchase since their use is known in advance.

Our plugin does not restrict which products can be purchased with the gift card so they are considered “multi-purpose” gift cards. Multi-purpose gift cards have the tax calculated at the time of use when the product is being purchased. It works more like a store credit that can be used to purchase any product in the future.

As a result, when a gift card is purchased there is no tax on it. When the customer redeems the gift cards, the products are appropriately taxed and the gift card balance is used to pay for the entire order amount.

The plugin does not exclude tax when the gift card is redeemed and as a result the purchase of a gift card should not be taxed to avoid double taxing the customer.

Single-purpose gift cards

If your store only sells a single product and you want to simulate single-purpose gift cards (tax the gift card, no tax on the purchase) you can follow these steps:

1. Set the Tax Status to “Taxable” by editing the PW Gift Card product and going to the General tab.
2. Download the free Code Snippets plugin https://wordpress.org/plugins/code-snippets/ and create a new Snippet with the following code (or you can alternatively add this to your functions.php file):

function pwgc_disable_tax_when_redeemed( $tax_enabled ) {
    if ( defined( 'PWGC_SESSION_KEY' ) && isset( WC()->session ) ) {
        $session_data = (array) WC()->session->get( PWGC_SESSION_KEY );
        if ( isset( $session_data['gift_cards'] ) && count( $session_data['gift_cards'] ) > 0 ) {
            $tax_enabled = false;
        }
    }

    return $tax_enabled;
}
add_filter( 'wc_tax_enabled', 'pwgc_disable_tax_when_redeemed' );

Email Placeholders

You can use the following placeholders in the WooCommerce email settings:

{gift_card_number}
{expiration_date}
{amount}
{sender}
{recipient_name}
{message}
{product_title}

Storefront Theme: Custom icon for Check Balance link on My Account page

Note: the “Check Balance” page is only available in the PW Gift Cards Pro version.

If you use the Storefront theme, you can change the icon for the Check Balance link on the My Account page by following these steps:

1. Log into your WordPress Admin area.
2. Click on Appearance -> Customize -> Additional CSS
3. Paste the following CSS into the field and save:

body.woocommerce-account ul li.woocommerce-MyAccount-navigation-link--pw-gift-card-balance a:before{
    content: "\f06b"
}

The f06b above corresponds to the unicode for the Font Awesome icons used by WooCommerce. You can find the unicode for other icons here:
https://fontawesome.com/icons?d=gallery&p=2&m=free

Custom Fields

It is possible for you to hook into the Bulk Edit Pro plugin to add the fields that you need to edit if you know the meta_key for the custom field.

Follow these instructions to add the custom fields to the Bulk Editor:

1. Download the free Code Snippets plugin: https://wordpress.org/plugins/code-snippets/
2. Create a Snippet with the following code (Note: If you are more comfortable with editing your functions.php you can do that instead of Code Snippets.):

function pw_bulk_edit_custom_columns( $columns ) {
    $columns[] = array(
        'name' => 'Field Name 1',
        'type' => 'text',
        'table' => 'meta',
        'field' => '_meta_key_of_field1',
        'visibility' => 'both',
        'readonly' => false,
        'sortable' => 'false'
    );

    $columns[] = array(
        'name' => 'Field Name 2',
        'type' => 'text',
        'table' => 'meta',
        'field' => '_meta_key_of_field2',
        'visibility' => 'both',
        'readonly' => false,
        'sortable' => 'false'
    );

    return $columns;
}
add_filter( 'pwbe_product_columns', 'pw_bulk_edit_custom_columns' );

For “type”, the valid options are text, currency, number, date, and checkbox.

Sorting
If you want to be able to sort by the custom field, set “sortable” to “true” in the above code and add the following code to the snippet:

function custom_pwbe_common_fields( $common_fields ) {
    global $wpdb;

    if ( isset( $_POST['order_by'] ) ) {
        if ( $_POST['order_by'] == '_meta_key_of_field1' ) {
            $common_fields .= ", (SELECT meta_value FROM {$wpdb->postmeta} WHERE post_id = post.ID AND meta_key = '_meta_key_of_field1') AS `_meta_key_of_field1`";
        }

        if ( $_POST['order_by'] == '_meta_key_of_field2' ) {
            $common_fields .= ", (SELECT meta_value FROM {$wpdb->postmeta} WHERE post_id = post.ID AND meta_key = '_meta_key_of_field2') AS `_meta_key_of_field2`";
        }
    }

    return $common_fields;
}
add_filter( 'pwbe_common_fields', 'custom_pwbe_common_fields' );

Calculated Fields
If you have a calculated field that you want to display, it will be read-only. Follow the instructions in this guide: Calculated Fields

Custom Filters

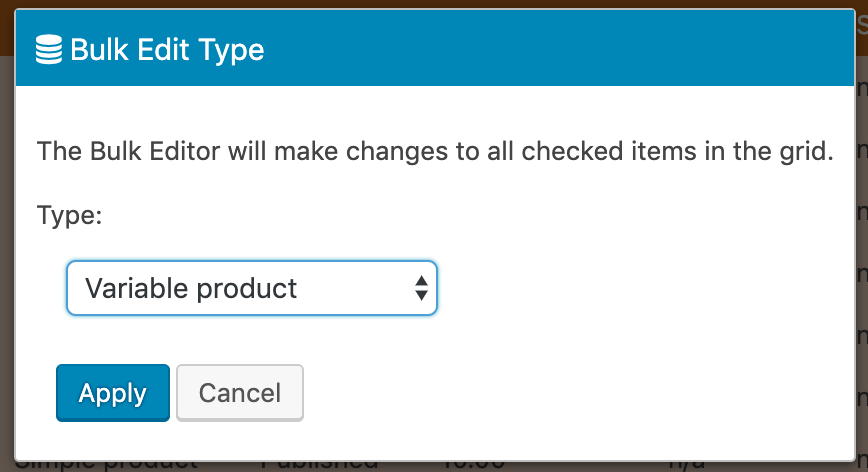
It is possible for you to hook into the Bulk Editor to add the filters that you need. Follow these instructions:

Note: If you are more comfortable with editing your functions.php you can do that instead of Code Snippets.

1. Download the free Code Snippets plugin: https://wordpress.org/plugins/code-snippets/
2. Create a Snippet with the following code:

function pw_bulk_edit_filter_types( $filter_types ) {
    $filter_types['meta_custom_field'] = array( 'name' => 'Custom field', 'type' => 'text' );

    return $filter_types;
}
add_filter( 'pwbe_filter_types', 'pw_bulk_edit_filter_types' );

function pw_bulk_edit_common_joins( $common_joins ) {
    global $wpdb;

    $common_joins .= "
        LEFT JOIN
            {$wpdb->postmeta} AS meta_custom_field ON (meta_custom_field.post_id = post.ID AND meta_custom_field.meta_key = 'custom_field')
    ";

    return $common_joins;
}
add_filter( 'pwbe_common_joins', 'pw_bulk_edit_common_joins' );

function pw_bulk_edit_where_clause( $row_sql, $field_name, $filter_type, $field_value, $field_value2, $group_type ) {

    if ( 'meta_custom_field' == $field_name ) {
        $sql_builder = new PWBE_SQL_Builder();
        $row_sql = $sql_builder->string_search( 'meta_custom_field.meta_value', $filter_type, $field_value, $field_value2 );
    }

    return $row_sql;
}
add_filter( 'pwbe_where_clause', 'pw_bulk_edit_where_clause', 10, 6 );

Examples

Published on and Last Updated (Post Date and Post Modified)
function pwbe_filter_types_dates( $filter_types ) {
    $filter_types['post_date'] = array( 'name' => 'Published On Date', 'type' => 'text' );
    $filter_types['post_modified'] = array( 'name' => 'Last Edited Date', 'type' => 'text' );

    return $filter_types;
}
add_filter( 'pwbe_filter_types', 'pwbe_filter_types_dates' );

function pwbe_where_clause_dates( $row_sql, $field_name, $filter_type, $field_value, $field_value2, $group_type ) {

    if ( in_array( $field_name, array( 'post_date', 'post_modified' ) ) ) {
        $sql_builder = new PWBE_SQL_Builder();
        $row_sql = $sql_builder->string_search( 'post.' . $field_name, $filter_type, $field_value, $field_value2 );
    }

    return $row_sql;
}
add_filter( 'pwbe_where_clause', 'pwbe_where_clause_dates', 10, 6 );
Sold Individually
function pw_bulk_edit_filter_types( $filter_types ) {
    $filter_types['meta__sold_individually'] = array( 'name' => __( 'Sold individually', 'woocommerce' ), 'type' => 'boolean' );

    return $filter_types;
}
add_filter( 'pwbe_filter_types', 'pw_bulk_edit_filter_types' );

function pw_bulk_edit_common_joins( $common_joins ) {
    global $wpdb;

    $common_joins .= "
        LEFT JOIN
            {$wpdb->postmeta} AS meta__sold_individually ON (meta__sold_individually.post_id = post.ID AND meta__sold_individually.meta_key = '_sold_individually')
    ";

    return $common_joins;
}
add_filter( 'pwbe_common_joins', 'pw_bulk_edit_common_joins' );

function pw_bulk_edit_where_clause( $row_sql, $field_name, $filter_type, $field_value, $field_value2, $group_type ) {

    if ( $field_name === 'meta__sold_individually' ) {
        $sql_builder = new PWBE_SQL_Builder();
        $row_sql = $sql_builder->boolean_search( $field_name . '.meta_value', $filter_type, $field_value, $field_value2 );
    }

    return $row_sql;
}
add_filter( 'pwbe_where_clause', 'pw_bulk_edit_where_clause', 10, 6 );
Author
function pw_bulk_edit_filter_types( $filter_types ) {
    $filter_types['author.user_login'] = array( 'name' => 'Post author login', 'type' => 'text' );
    $filter_types['author.user_email'] = array( 'name' => 'Post author email', 'type' => 'text' );
    $filter_types['author.display_name'] = array( 'name' => 'Post author name', 'type' => 'text' );

    return $filter_types;
}
add_filter( 'pwbe_filter_types', 'pw_bulk_edit_filter_types' );

function pw_bulk_edit_common_fields( $common_fields ) {
    global $wpdb;

    $common_fields .= ",
        author.user_login AS author_login,
        author.user_email AS author_email,
        author.display_name AS author_display_name
    ";

    return $common_fields;
}
add_filter( 'pwbe_common_fields', 'pw_bulk_edit_common_fields' );

function pw_bulk_edit_common_joins( $common_joins ) {
    global $wpdb;

    $common_joins .= "
        LEFT JOIN
            {$wpdb->users} AS author ON (author.ID = post.post_author)
    ";

    return $common_joins;
}
add_filter( 'pwbe_common_joins', 'pw_bulk_edit_common_joins' );

function pw_bulk_edit_where_clause( $row_sql, $field_name, $filter_type, $field_value, $field_value2, $group_type ) {

    if ( in_array( $field_name, array( 'author.user_login', 'author.user_email', 'author.display_name' ) ) ) {
        $sql_builder = new PWBE_SQL_Builder();
        $row_sql = $sql_builder->string_search( $field_name, $filter_type, $field_value );
    }

    return $row_sql;
}
add_filter( 'pwbe_where_clause', 'pw_bulk_edit_where_clause', 10, 6 );
Images
function pw_bulk_edit_filter_types( $filter_types ) {
    $filter_types['thumbnail_id'] = array( 'name' => 'Thumbnail ID', 'type' => 'numeric' );

    return $filter_types;
}
add_filter( 'pwbe_filter_types', 'pw_bulk_edit_filter_types' );

function pw_bulk_edit_common_joins( $common_joins ) {
    global $wpdb;

    $common_joins .= "
        LEFT JOIN
            {$wpdb->postmeta} AS thumbnail_id ON (thumbnail_id.post_id = parent.ID AND thumbnail_id.meta_key = '_thumbnail_id')
    ";

    return $common_joins;
}
add_filter( 'pwbe_common_joins', 'pw_bulk_edit_common_joins' );

function pw_bulk_edit_where_clause( $row_sql, $field_name, $filter_type, $field_value, $field_value2, $group_type ) {

    if ( $field_name === 'thumbnail_id' ) {
        $sql_builder = new PWBE_SQL_Builder();
        $row_sql = $sql_builder->numeric_search( 'thumbnail_id.meta_value', $filter_type, $field_value, $field_value2 );
    }

    return $row_sql;
}
add_filter( 'pwbe_where_clause', 'pw_bulk_edit_where_clause', 10, 6 );
Product ID
function pwbe_filter_types_product_id( $filter_types ) {
    $filter_types['post.ID'] = array( 'name' => 'Product ID', 'type' => 'numeric' );

    return $filter_types;
}
add_filter( 'pwbe_filter_types', 'pwbe_filter_types_product_id' );

function pwbe_common_fields_product_id( $common_fields ) {
    global $wpdb;

    $common_fields .= ",
        post.ID AS product_id
    ";

    return $common_fields;
}
add_filter( 'pwbe_common_fields', 'pwbe_common_fields_product_id' );

function pwbe_where_clause_product_id( $row_sql, $field_name, $filter_type, $field_value, $field_value2, $group_type ) {

    if ( in_array( $field_name, array( 'post.ID' ) ) ) {
        $sql_builder = new PWBE_SQL_Builder();
        $row_sql = $sql_builder->numeric_search( $field_name, $filter_type, $field_value, $field_value2 );
    }

    return $row_sql;
}
add_filter( 'pwbe_where_clause', 'pwbe_where_clause_product_id', 10, 6 );
Enable Reviews
function pw_bulk_edit_filter_types( $filter_types ) {
    $filter_types['comment_status'] = array( 'name' => __( 'Enable Reviews', 'woocommerce' ), 'type' => 'boolean' );

    return $filter_types;
}
add_filter( 'pwbe_filter_types', 'pw_bulk_edit_filter_types' );

function pw_bulk_edit_where_clause( $row_sql, $field_name, $filter_type, $field_value, $field_value2, $group_type ) {

    if ( $field_name === 'comment_status' ) {
        if ( $filter_type == 'is checked' ) {
            $row_sql = "parent.comment_status = 'open'";
        } else {
            $row_sql = "parent.comment_status = 'closed'";
        }
    }

    return $row_sql;
}
add_filter( 'pwbe_where_clause', 'pw_bulk_edit_where_clause', 10, 6 );
Menu Order
function pwbe_filter_types_product_id( $filter_types ) {
    $filter_types['post.menu_order'] = array( 'name' => 'Menu Order', 'type' => 'numeric' );

    return $filter_types;
}
add_filter( 'pwbe_filter_types', 'pwbe_filter_types_product_id' );

function pwbe_where_clause_product_id( $row_sql, $field_name, $filter_type, $field_value, $field_value2, $group_type ) {

    if ( in_array( $field_name, array( 'post.menu_order' ) ) ) {
        $sql_builder = new PWBE_SQL_Builder();
        $row_sql = $sql_builder->numeric_search( $field_name, $filter_type, $field_value, $field_value2 );
    }

    return $row_sql;
}
add_filter( 'pwbe_where_clause', 'pwbe_where_clause_product_id', 10, 6 );

Affiliate Report Template (front end)

We use the WordPress template system to make it possible for easy customization. To override the affiliate report, copy this file:

/wp-content/plugins/pw-woocommerce-affiliates/templates/woocommerce/pw-affiliates-report.php

To here (you may need to create the subfolders if they do not exist in your theme folder):

/wp-content/themes/<your-active-theme>/woocommerce/pw-affiliates-report.php

Once the file is in your theme folder, open it up in a text editor and make any changes.

Product ID Filter

Note: This requires the PW Bulk Edit Pro version.

It is possible for you to hook into the Bulk Editor to add a filter for Product ID. Follow these instructions:

If you are more comfortable with editing your functions.php you can do that instead of Code Snippets.

1. Download the free Code Snippets plugin https://wordpress.org/plugins/code-snippets/
2. Create a Snippet with the following code:

function pwbe_filter_types_product_id( $filter_types ) {
    $filter_types['post.ID'] = array( 'name' => 'Product ID', 'type' => 'numeric' );

    return $filter_types;
}
add_filter( 'pwbe_filter_types', 'pwbe_filter_types_product_id' );

function pwbe_common_fields_product_id( $common_fields ) {
    global $wpdb;

    $common_fields .= ",
        post.ID AS product_id
    ";

    return $common_fields;
}
add_filter( 'pwbe_common_fields', 'pwbe_common_fields_product_id' );

function pwbe_where_clause_product_id( $row_sql, $field_name, $filter_type, $field_value, $field_value2, $group_type ) {

    if ( in_array( $field_name, array( 'post.ID' ) ) ) {
        $sql_builder = new PWBE_SQL_Builder();
        $row_sql = $sql_builder->numeric_search( $field_name, $filter_type, $field_value, $field_value2 );
    }

    return $row_sql;
}
add_filter( 'pwbe_where_clause', 'pwbe_where_clause_product_id', 10, 6 );

Used For Variations checkbox

This customization requires the PW Bulk Edit Pro version.

The “Used For Variations” checkbox can be added to the bulk editor by following these steps:

1. Download the free Code Snippets plugin https://wordpress.org/plugins/code-snippets/
2. Create a Snippet with the following code (Note: If you are more comfortable with editing your functions.php you can do that instead of Code Snippets.):

function pw_bulk_edit_custom_columns( $columns ) {
    $attributes = PWBE_Attributes::get_attributes();
    foreach ( $attributes as $attribute ) {
        $columns[] = array(
            'name' => $attribute['name'] . ' used for variations',
            'type' => 'checkbox',
            'table' => 'attributes',
            'field' => '_attribute_variations_' . $attribute['slug'],
            'readonly' => 'false',
            'visibility' => 'parent',
            'sortable' => 'false',
            'views' => array( 'all' )
        );
    }

    return $columns;
}
add_filter( 'pwbe_product_columns', 'pw_bulk_edit_custom_columns' );
By default, when you check the “Used for Variations” checkbox in the bulk editor, all appropriate Variations will be created automatically. If you do not want to automatically create the Variations, include the following line after the code above:
define( 'PWBE_IS_VARIATION_CREATES_ALL_VARIATIONS', false );

Change the price range display

WooCommerce shows a price range to let the customer know the minimum and maximum price for the product.

If you have the PW Gift Cards Pro version, you can set the minimum and maximum for the Custom Amounts by editing the gift card product in your WooCommerce admin area. If you don’t allow custom amounts then the minimum and maximum will be the range of prices available.

WooCommerce will show the minimum and maximum for these types of products, however you can override it. To customize the price range text, follow these steps:

1. Download the free Code Snippets plugin https://wordpress.org/plugins/code-snippets/
2. Create a new Snippet with the following code:

function pwgc_variable_price_html( $price_html, $product ) {
    if ( $product->get_type() == 'pw-gift-card' ) {
        $price_html = 'Custom';
    }

    return $price_html;
}
add_filter( 'woocommerce_variable_sale_price_html', 'pwgc_variable_price_html', 10, 2 );
add_filter( 'woocommerce_variable_price_html', 'pwgc_variable_price_html', 10, 2 );

3. Change the ‘Custom’ value to whatever you would like to see.

Note: If you are more comfortable adding the code to your functions.php you can do that instead of using Code Snippets.

Hide the “Pimwick Plugins” menu

Follow these instructions to hide the Pimwick Plugins menu.

Note: this change can be made to your functions.php if you prefer that option.

1. Download the free Code Snippets plugin: https://wordpress.org/plugins/code-snippets/
2. Create a Snippet with the following code:

function remove_pimwick_plugins_menu( $columns ) {
    remove_menu_page( 'pimwick' );
}
add_action( 'admin_menu', 'remove_pimwick_plugins_menu', 99, 1 );

Let me know if you have any questions!

Single amount per product (Simple Product)

You can optionally have a single, fixed amount for the gift card product so that the customer does not have to select the amount.

The PW Gift Card product type is an extension of the Variable Product type in WooCommerce. If you have the PW Gift Cards Pro version you can choose a default amount for the gift card product. Using this feature you can accomplish your goal by taking the following steps:

1. Create the PW Gift Card product with 1 fixed amount.
2. Set the “Default Amount” option to the fixed amount.
3. Hide the “Select an amount” dropdown menu by following these steps:
https://www.pimwick.com/pw-faq/hide-amount-selection-dropdown-menu/

Create a custom View

You can customize your view by starting with the Standard Columns and then copying the View to give it a name:

1. Filter the products and select “Standard Columns” from the View dropdown menu

2. Once you have the Standard Columns view selected, click on the Copy View button:

3. You will be prompted to provide a name for your new custom view. After you click OK, you can add any columns you want to see by clicking the “Edit View” button:

4. Click on the columns you want to show in the grid:

List products on sale using a shortcode

Note: this requires the PW Black Friday Pro version.

The sale prices aren’t actually being changed in the database, it is happening on the fly based on the promotion configuration.

We added a new attribute to the products shortcode called pw_black_friday. To use it, append the pw_black_friday attribute to your products shortcode. For example:

[products limit="4" columns="2" pw_black_friday="8"]

This will show 4 products in 2 columns from the Black Friday event “8”. For more information on the products shortcode, follow this link:
https://docs.woocommerce.com/document/woocommerce-shortcodes/

Note: to get the Black Friday ID, click on the Deal inside the event to edit it. You will see the ID in your browser bar.

Ignore / prevent Coupons when purchasing a gift card

This requires the PW Gift Cards Pro version.

Follow these steps to prevent any coupon from discounting the PW Gift Card product when it is being purchased:

1. Log into your WordPress admin area.
2. Click on the Products menu on the left.
3. Edit the PW Gift Card product.
4. On the “Gift Card” tab, check the box that says “Ignore coupons”
5. Click the blue “Update” button.

Column Width

You can adjust the CSS file to allow the columns to be wider.

To make this change, follow these steps:

1. Download the free Code Snippets plugin https://wordpress.org/plugins/code-snippets/
2. Create a new Snippet with the following code:

add_action( 'admin_head', 'pw_bulk_edit_custom_column_width' );
function pw_bulk_edit_custom_column_width() {
    ?>
    <style>
        .pwbe-results-table-td {
            max-width: 900px !important;
        }
    </style>
    <?php
}

Adjust the 900px to suit your needs. The default value is 300px and if you want no limit, change the “900px” to “initial”.

Resend the gift card email

Sending a gift card email again requires the PW Gift Cards Pro version. If you do not have the Pro version you will have to copy / paste the gift card number and manually email it to the recipient.

Note: When viewing the Order in the admin area, simply click on the gift card number and go directly to Step 3 below.

  1. Log into your WordPress admin area.
  2. Click on Pimwick Plugins -> PW Gift Cards
  3. Locate the gift card number you wish to resend and click the “Email Gift Card” button.

If you do not have the Pro version, you must email the gift card number manually. Simply copy and paste the gift card number into an email and send it to the correct recipient.

Stock Status does not change

Note: this requires the PW WooCommerce Bulk Edit Pro version.

There is a WooCommerce bug regarding stock status, however you can still get your products to update by performing the following steps.

1. Go to WooCommerce -> Settings -> Products -> Inventory -> Check the “Manage Stock” checkbox (this is temporary). Save the settings.
2. Now return to the bulk editor and filter your products. You will see a “Manage Stock” checkbox available on the Variable product.
3. Uncheck the “Manage Stock” for the Variable (parent) product and save.
4. Return to the setting in Step 1 and uncheck the “Manage Stock” checkbox.
5. You can now edit the Stock Status for the Variations.

Unfortunately this isn’t a bug in our plugin. If you’re curious you can see this in action with the following steps:

1. Go to WooCommerce -> Settings -> Products -> Inventory -> Check the “Manage Stock” checkbox (this is temporary). Save the settings.
2. Edit the Variable product in WooCommerce and click the Inventory tab and check the “Manage Stock” checkbox. Save the changes to the product by clicking the blue Update button.
3. Return to the setting in Step 1 and uncheck the “Manage Stock” checkbox.
4. Edit the Variable product again and go to the Variations tab. You will see “Out of Stock” and even if you change it to “In Stock” and save it will revert back to “Out of Stock”.

It appears as though WooCommerce is marking the Variations as “Out of Stock” if the Variable product is marked as “Manage Stock”, regardless of the global stock setting.

Allow (or prevent) Free Shipping when a gift card is redeemed

1. Download the free Code Snippets plugin: https://wordpress.org/plugins/code-snippets/
2. Create a Snippet with the following code:

Allow Free Shipping when a gift card is redeemed:
function custom_woocommerce_shipping_free_shipping_is_available( $is_available, $package, $wc_shipping_method ) {
    if ( true !== $is_available ) {
        $session_data = (array) WC()->session->get( PWGC_SESSION_KEY );
        if ( isset( $session_data['gift_cards'] ) && count( $session_data['gift_cards'] ) > 0 ) {
            $is_available = true;
        }
    }

    return $is_available;
}
add_filter( 'woocommerce_shipping_free_shipping_is_available', 'custom_woocommerce_shipping_free_shipping_is_available', 10, 3 );
Do not allow Free Shipping when a gift card is redeemed:
function custom_woocommerce_shipping_free_shipping_is_available( $is_available, $package, $wc_shipping_method ) {
    if ( true === $is_available ) {
        $session_data = (array) WC()->session->get( PWGC_SESSION_KEY );
        if ( isset( $session_data['gift_cards'] ) && count( $session_data['gift_cards'] ) > 0 ) {
            $is_available = false;
        }
    }

    return $is_available;
}
add_filter( 'woocommerce_shipping_free_shipping_is_available', 'custom_woocommerce_shipping_free_shipping_is_available', 99, 3 );

Gift card number not generated on the Order

Confirm that the order status is “Complete”. The gift card number is generated and emailed once the order is complete.

The gift card plugin will automatically mark orders complete if they do not contain physical products that need to be shipped.

If you would like to send the gift card email after payment is received, even if the order itself is still Processing, then change the following setting:

Pimwick Plugins -> PW Gift Cards -> Settings -> Send When Order Received (checked).

If the gift card number is being generated but the email is not being received, see our troubleshooting guide here:
https://www.pimwick.com/pw-faq/gift-card-emails-not-being-sent-or-received/

Physical Gift Cards
If you have checked the “Physical Gift Card” box for this gift card, make sure that you have an email address entered into the “Recipient Email Address” field. If this field is left blank, no gift card number will be generated. This is useful if you have pre-printed physical gift cards and do not need a new gift card number to be generated. Typically the “Recipient Email Address” will be the store admin email.

Change your License Key

If you have a new License Key, you can change it by performing the following steps:

1. Log into your WordPress admin area.
2. Click on the Plugins menu on the left.
3. Scroll down to your installed plugin.
4. Click on the “View / Edit License Key” link
5. Enter your new license key.

Facebook for WooCommerce – Gift Card not syncing

Facebook doesn’t allow Virtual products to be sold in their store.

The PW Gift Card product is marked as “Virtual” in WooCommerce since it isn’t a physical product.

For more information, see the Facebook for WooCommerce documentation:
https://woocommerce.com/document/facebook-for-woocommerce-products-are-not-displaying-in-facebook-shop/#virtual-products

Custom order for the amounts drop-down menu (Variations)

By default, new gift card amounts will be sorted from least-expensive to most-expensive.

If you want to set a custom sort order, follow these steps:

1. Download the wp-config.php from your FTP server.
2. Keep a backup of wp-config.php in case there are problems.
3. Edit wp-config.php and scroll to the end and add the following bit of code:

Scroll towards the bottom, and before the line that says “Happy blogging.” add this code ABOVE that line:

define( 'PWGC_SORT_VARIATIONS', false );

/* That's all, stop editing! Happy blogging. */

4. Save the wp-config.php file and re-upload it to your server. If you have any problems, replace wp-config.php with your backup file.
5. Log into your WordPress admin area and click on the Products menu.
6. Edit the PW Gift Card product and click the Variations tab.
7. Use the sort icon to drag and drop the variations into the desired order.
8. Click on Save Changes.

Limit number of gift cards shown in the admin area

By default, we load 500 cards at a time. There is a “Load More” button displayed to continue loading more products.

On some systems this can still be too many records at once so you can adjust this number by taking the following steps:

1. Download the wp-config.php from your FTP server.
2. Keep a backup of wp-config.php in case there are problems.
3. Edit wp-config.php and scroll to the end and add the following bit of code:

Scroll towards the bottom, and before the line that says “Happy blogging.” add this code ABOVE that line:

define( 'PWGC_ADMIN_MAX_ROWS', 250 );

/* That's all, stop editing! Happy blogging. */

4. Save the wp-config.php file and re-upload it to your server.

Adjust the “250” value to suit your needs.

If you have any problems, replace wp-config.php with your backup file.

Discount highest in group

Note: this requires the PW WooCommerce BOGO Pro version.

By default, our plugin will always discount the least-expensive items in the group and charge full price for the most-expensive items in the group.

So for example, if you have the following products in the cart:

1 x Green, $4
1 x Blue, $3
2 x Red, $2
2 x White, $1

And assuming all four products are Eligible Products as well as Discounted Products, the calculation will play out as follows:

Buy 2 at full price (Blue and Green) = $7
Get 1 for free (White) = $1 discount

Buy 2 at full price (Red and Red) = $4
Get 1 for free (White) = $1 discount

The “eligible items” are always the most expensive items first. If you instead want to do something like this:

Buy 2 at full price (Blue and Green) = $7
Get 1 for free (Red) = $2 discount

Buy 2 at full price (Red and White) = $3
Get 1 for free (White) = $1 discount

In this case, you are flipping the algorithm to discount the highest priced item in the group first. You can do this by taking the following steps:

1. Download the wp-config.php from your FTP server.
2. Keep a backup of wp-config.php in case there are problems.
3. Edit wp-config.php and scroll to the end and add the following bit of code:

Scroll towards the bottom, and before the line that says “Happy blogging.” add this code ABOVE that line:

define( 'PW_BOGO_DISCOUNT_HIGHEST_IN_GROUP', true );

/* That's all, stop editing! Happy blogging. */

4. Save the wp-config.php file and re-upload it to your server.

If you have any problems, replace wp-config.php with your backup file.

Let me know if you have any questions!

Change the text on the form (the “To”, “From”, and “Message” fields)

If you would like to change the wording, you have two options. You can either “translate” it into your store’s default language or you can override the template.

To translate, install the free Loco Translate plugin: https://wordpress.org/plugins/loco-translate/

Then follow these steps to “translate” the text for your site’s language:

1. Click on the Loco Translate -> Plugins menu on the left.
2. Click on the PW WooCommerce
3. Click on the New Language button
4. Set the following options:
Choose a Language = Your site’s langauge
Choose a Location = Custom (the default selection will store the translation in your own languages folder)
5. Click on Start Translating

If you need more control, you can override the template. Follow the steps from our guide here:
https://www.pimwick.com/pw-faq/to-from-message-fields-template/

Change the Redeem button link (URL) in the email

The Redeem URL defaults to the page specified under WooCommerce -> Settings -> Products -> Shop Page.

You can change the Redeem URL by clicking on Pimwick Plugins -> PW Gift Cards -> Settings -> Redeem URL. This will change the default value for all Designs, however if you have a different URL for each Design you can also change it on the individual Designs (Pimwick Plugins -> PW Gift Cards -> Designer -> Redeem URL).

Note: This requires the PW WooCommerce Gift Cards Pro version. If you have the free version, there is a hook available to change the URL for the “Redeem” button:

1. Download the free Code Snippets plugin: https://wordpress.org/plugins/code-snippets/
2. Create a Snippet with the following code:

function custom_pwgc_redeem_url( $redeem_url, $item_data ) {
    //
    // Change this URL in the quotes. Leave the quotes intact.
    //
    $shop_url = 'https://www.thesite.com';

    // Leave the remainder of the code unchanged.
    if ( empty( $shop_url ) ) {
        $shop_url = site_url();
    }
    $redeem_url = add_query_arg( 'pw_gift_card_number', urlencode( $item_data->gift_card_number ), $shop_url );

    return $redeem_url;
}
add_filter( 'pwgc_redeem_url', 'custom_pwgc_redeem_url', 10, 2 );

3. Change the $shop_url to whatever you need

Note: If you prefer to put the code in your functions.php you can do that instead of using Code Snippets.

How to add Attributes

Note: this requires the PW WooCommerce Bulk Edit Pro version.

To add new Attributes to the parent (Variable) product, follow these steps.

For this example we will use the “Size” attribute:

1. Filter your products using the Bulk Editor.
2. Click on the Size Attributes column and then Edit All Checked Products.

3. Click on “Add To Size Attributes” and enter the attributes you want to add. Note: if you want to create a new attribute that doesn’t already exist, go to the WooCommerce Attributes setup area by clicking on Products -> Attributes in the left hand admin menu.

Prefix or suffix to the generated numbers

You can add a prefix or suffix to the randomly generated card numbers by taking the following steps:

1. Install the free Code Snippets plugin: https://wordpress.org/plugins/code-snippets/
2. Create a new Snippet with the following code:

function custom_pw_gift_cards_random_card_number( $card_number ) {
    return 'PP' . $card_number;
}
add_filter( 'pw_gift_cards_random_card_number', 'custom_pw_gift_cards_random_card_number' );

Note: if you prefer, add the code to your functions.php rather than using Code Snippets.

To customize the randomly generated number format, follow the steps in this guide:
https://www.pimwick.com/pw-faq/change-the-generated-number-format/

Customizing the colors

Follow these steps to customize the colors of the bulk editor:

Note: If you prefer, put the code in your functions.php instead of using Code Snippets.

1. Download the free Code Snippets plugin https://wordpress.org/plugins/code-snippets/
2. Create a new Snippet with the following code:

function pwbe_custom_color() {
  ?>
  <style>
    .pwbe-tr-product {
        background-color: #F9F9F9 !important;
    }

    .pwbe-tr-variation {
        background-color: #FFFFFF !important;
    }
  </style>
  <?php
}
add_action( 'admin_head', 'pwbe_custom_color');


Examples

Stock Quantity and Low Stock Threshold fields

function pwbe_custom_color() {
  ?>
  <style>
    .pwbe-field-_stock {
      background-color: #80bfff;
    }

    .pwbe-field-_low_stock_amount {
      background-color: #ffffcc;
    }
  </style>
  <?php
}
add_action( 'admin_head', 'pwbe_custom_color');


Stop color from changing to a fainter color when unselected.

add_action( 'admin_head', 'pwbe_custom_color' );

function pwbe_custom_color() {
    ?>
    <style>
        .pwbe-product-tr {
            color: rgba(0, 0, 0, 1) !important;
        }
    </style>
    <?php
}

Associate a Coupon Code to provide a discount along with affiliate code

Note: This feature requires the PW WooCommerce Affiliates Pro version.

1. Click on Pimwick Plugins -> PW Affiliates
2. Click on the “Edit Affiliate” button for the affiliate
3. Locate the Affiliate Code and copy the value.
4. Click on Marketing -> Coupons (or WooCommerce -> Coupons if you have an older version).
5. Click on Add Coupon
6. In the “Coupon Code” field, enter the affiliate code copied from Step 3
7. Configure the rest of the coupon as needed.

Role / Privilege for Gift Cards Admin

By default, the gift card admin requires the “Shop Manager” privilege (manage_woocommerce). You can alter this in your wp-config.php file if you would like to create a separate role for the store managers.

They would still access the WordPress back end however since they don’t have the “Shop Manager” role they won’t be able to make any other WooCommerce changes.

Follow these steps to switch the required privilege for the Gift Card admin:

1. Log into your FTP site and edit wp-config.php
2. Edit wp-config.php and scroll to the end and add the following bit of code:

Scroll towards the bottom, and before the line that says “Happy blogging.” add this code ABOVE that line (translate as needed):

define( 'PWGC_REQUIRES_PRIVILEGE', 'your_custom_privilege' );

/* That's all, stop editing! Happy blogging. */

3. Save the wp-config.php file and re-upload it to your server.

Change the “your_custom_privilege” value to the privilege you created for the store managers.

You can also use built-in roles and privileges such as ‘edit_posts’, ‘publish_posts’, etc.

Grouped Products

Unfortunately the BOGO Pro doesn’t work with Grouped Products.

It is because of the way that WooCommerce handles a “Grouped Product”. WooCommerce just uses the grouping on the initial display. Once the products have been added to the cart, it is impossible to know that it came from a Grouped Product or if the products were added individually.

With that being said, there is an optional plugin called WooCommerce Product Bundles that is compatible with the BOGO Pro. This isn’t our plugin but you can find out more about it here:
https://woocommerce.com/products/product-bundles/

This plugin will create a Bundle product that is different than the simple grouping mechanism that WooCommerce core uses.

Show gift cards on the My Account page

It isn’t possible to show the gift cards directly on the My Account page. This is a common request and it is a feature we are considering for a future update. If you would like to be notified when this is available, send us an email.

Why not?

Gift Card numbers are not tied to specific accounts. It isn’t a requirement that the recipient of a gift card have previously created an account at your store. The purchasing customer supplies the recipient’s email address and the recipient can redeem even as a guest.

The “My Account” page can link to the “Check Balance” page so that the customer can enter a gift card number into the field to check the balance.

When the recipient clicks on the “Redeem” button in the email, it will associate the gift card with their session. That way as soon as they add a product to the cart, the gift card will already be applied and will show the remaining balance.

Prevent gift cards from counting towards the Free Shipping amount

Some stores will offer Free Shipping once a certain amount has been spent.

You can prevent the purchase of a gift cards from counting towards the order total when calculating free shipping. Follow these steps:

1. Download the free Code Snippets plugin: https://wordpress.org/plugins/code-snippets/
2. Create a Snippet with the following code:

function woocommerce_cart_get_subtotal_minus_giftcards( $subtotal ) {
  $giftcard_subtotal = 0;

  foreach( WC()->cart->get_cart() as $cart_item_key => $cart_item ) {
    $product = wc_get_product( $cart_item['product_id'] );
    if ( is_a( $product, 'WC_Product_PW_Gift_Card' ) ) {
      $giftcard_subtotal += $cart_item['line_subtotal'];
    }
  }

  $subtotal -= $giftcard_subtotal;

  return $subtotal;
}

function free_shipping_recalculation( $is_available, $package, $wc_shipping_method ) {
  if ( true === $is_available ) {
    remove_filter( 'woocommerce_shipping_free_shipping_is_available', 'free_shipping_recalculation', 10, 3 );
    add_filter( 'woocommerce_cart_get_subtotal', 'woocommerce_cart_get_subtotal_minus_giftcards' );

    $is_available = $wc_shipping_method->is_available( $package );

    add_filter( 'woocommerce_shipping_free_shipping_is_available', 'free_shipping_recalculation', 10, 3 );
    remove_filter( 'woocommerce_cart_get_subtotal', 'custom_woocommerce_cart_get_subtotal' );
  }

  return $is_available;
}
add_filter( 'woocommerce_shipping_free_shipping_is_available', 'free_shipping_recalculation', 10, 3 );

Rename the “Gift Card Amount” attribute

The attribute name is defined in the plugin so that it will match and still allow other attributes. Follow these steps to change the “Gift Card Amount” attribute name:

1. Log into your FTP site and edit wp-config.php
2. Edit wp-config.php and scroll to the end and add the following bit of code:

Scroll towards the bottom, and before the line that says “Happy blogging.” add this code ABOVE that line (translate as needed):

define( 'PWGC_DENOMINATION_ATTRIBUTE_NAME', 'Gift Card Amount' );

/* That's all, stop editing! Happy blogging. */

3. Save the wp-config.php file and re-upload it to your server.
4. Edit the PW Gift Card product and change the attribute name to match then save the product.

Restrict payment methods when buying a gift card

There are paid plugins available that will allow you to restrict the payment methods by product, however you can also do this yourself for the gift cards in a few steps.

1. Download the free Code Snippets plugin: https://wordpress.org/plugins/code-snippets/
2. Create a Snippet with the following code:

function pw_gift_card_payment_methods( $available_gateways ) {
    global $pw_gift_cards_redeeming;

    if ( is_admin() ) {
        return $available_gateways;
    }

    if ( isset( $pw_gift_cards_redeeming ) && $pw_gift_cards_redeeming->cart_contains_gift_card() ) {
        // Cash on Delivery
        unset( $available_gateways['cod'] );

        // Direct Bank Transfer
        unset( $available_gateways['bacs'] );
    }

    return $available_gateways;
}
add_filter( 'woocommerce_available_payment_gateways', 'pw_gift_card_payment_methods' );

If you are more comfortable editing your functions.php file that works, too.

The key used in the $available_gateways array can be found by going to WooCommerce -> Settings -> Payments -> Look for the “section=” in the URL for the payment method.

Change the generated number format and/or length

The auto-generated numbers are random for security purposes to keep people from guessing the numbers. Also, when an invalid gift card number is entered into the site, there is a “tar pit” of 5 seconds. This makes it nearly impossible for someone to brute-force guess a gift card number.

The auto-generated codes are 4 sets of 4 characters. If necessary, you can tweak the auto-generated gift card codes by following these steps:

1. Download the wp-config.php from your FTP server.
2. Keep a backup of wp-config.php in case there are problems.
3. Edit wp-config.php and scroll to the end and add the following bit of code:

Scroll towards the bottom, and before the line that says “Happy blogging” and “ABSINT”, add this code ABOVE that line:

define( 'PWGC_RANDOM_CARD_NUMBER_SECTIONS', '4' );
define( 'PWGC_RANDOM_CARD_NUMBER_SECTION_LENGTH', '4' );
define( 'PWGC_RANDOM_CARD_NUMBER_CHARSET', 'ABCDEFGHJKLMNPQRSTUVWXYZ23456789' );

4. Change the values for the settings as you see fit. We default to 4 sections that are 4 characters each.
5. Save the wp-config.php file and re-upload it to your server.

If you have any problems, replace wp-config.php with your backup file.

To add a prefix or a suffix to the randomly generated number, follow the steps in this guide:
https://www.pimwick.com/pw-faq/prefix-or-suffix-to-the-generated-numbers/

Hide Variations and only show parent Variable product

Note: This requires the PW Bulk Edit Pro version.

To prevent Variations from being returned in the results, simply add a “Product Type is any of Variable Product” filter.

Allow custom amounts when purchasing

Note: this requires the PW Gift Cards Pro version.

To allow customers to specify their own amount for a purchased gift card, follow these steps:

1. Log into your WordPress admin area.
2. Click on the Products menu on the left.
3. Edit the PW Gift Card product.
4. On the “Gift Card” tab, check the box that says “Allow custom amounts”.
5. Specify a minimum and maximum amount.
6. Click on the blue “Update” button at the top right.

Change the “Add To Cart” button text

Follow these instructions to change the text on the Add to Cart buttons.

NOTE: This will change it for all buttons, not just the gift card button.

1. Download the free Code Snippets plugin https://wordpress.org/plugins/code-snippets/
2. Create a new Snippet with the following code:

function custom_woocommerce_product_single_add_to_cart_text() {
    return 'Add to Bag';
}
add_filter( 'woocommerce_product_single_add_to_cart_text', 'custom_woocommerce_product_single_add_to_cart_text' );

function custom_woocommerce_product_add_to_cart_text() {
    return 'Add to Bag';
}
add_filter( 'woocommerce_product_add_to_cart_text', 'custom_woocommerce_product_add_to_cart_text' );

Note: you can add the code to your functions.php instead of using Code Snippets if you are more comfortable with that.

Change the “Select Amount” button text

To change the “Select Amount” button text to something else, follow these steps:

1. Download the free Code Snippets plugin https://wordpress.org/plugins/code-snippets/
2. Create a new Snippet with the following code:

function custom_pwgc_select_amount_text( $text, $product ) {
    return 'Select amount';
}
add_filter( 'pwgc_select_amount_text', 'custom_pwgc_select_amount_text', 10, 2 );

Note: you can add the code to your functions.php instead of using Code Snippets if you are more comfortable with that.

Hide amount selection drop-down menu

First, ensure that the default amount is specified under Products -> PW Gift Card -> Default so that it is automatically selected when the customer arrives on the gift card product.

Then you can hide the Select Amount dropdown menu by taking the following steps:

1. Log into your WordPress Admin area.
2. Click on Appearance -> Customize -> Additional CSS (note: not every theme has this setting, though most do.)
3. Paste the following CSS into the field and save:

.product-type-pw-gift-card .variations {
    display: none !important;
}

Translate to other languages

All strings in the plugin are wrapped in the WordPress Internationalization function so that they can be translated to any language.

We recommend using the free Loco Translate plugin to do any custom translations that you need for your shop. https://wordpress.org/plugins/loco-translate/.

Translating the Email Designer fields using WPML

Strings such as Gift Card Title and Redeem Button Text can be translated by going to WPML > String Management > Search for the string that you have in the field (such as “Your Site Gift Card”) and click the “Can’t find the strings you’re looking to translate?” option. Search again for the string and add it to the WPML String Translation configuration. You can now translate this string.

For more information on this product, see the official documentation from WPML here:
https://wpml.org/documentation/getting-started-guide/string-translation/finding-strings-that-dont-appear-on-the-string-translation-page/#strings-arent-selected-for-translation

Bulk Delete Products and Variations

Note: This requires the PW Bulk Edit Pro version.

To delete products in the bulk editor, set the value of the Status column to Trash.

If you prefer to permanently delete them from the database, you can set the Status to Delete.

Renaming / translating the “Other Amount” option

The “Other amount” attribute name is handled by the plugin, but you can rename this by taking the following steps. After renaming this field you will need to re-create the “Other amount” option by toggling the checkbox (steps 5 and 6 below).

1. Log into your FTP site and edit wp-config.php
2. Edit wp-config.php and scroll to the end and add the following bit of code:

Scroll towards the bottom, and before the line that says “Happy blogging.” add this code ABOVE that line (translate as needed):

define( 'PWGC_OTHER_AMOUNT_PROMPT', 'Custom Amount' );

/* That's all, stop editing! Happy blogging. */

3. Save the wp-config.php file and re-upload it to your server.
4. Log into the WordPress admin area, click Products, and edit the Gift Card product.
5. Uncheck the box that says “Allow custom amounts” and click on “Update”.
6. Check the box that says “Allow custom amounts” and click on “Update”.

Bulk Create Gift Cards

Note: this requires the PW Gift Cards Pro version.

1. Click on Pimwick Plugins -> PW Gift Cards -> Create Gift Cards
2. Enter the number of cards you want to create, specify the initial balance, and set any additional fields. Then click on Create:

It will generate the cards and display them:

Gift card database tables

There are two tables that the gift cards use for storing information:

wp_pimwick_gift_card
Stores the card number, expiration date, and active flag.

wp_pimwick_gift_card_activity
This table contains the transaction log to record loading and redeeming the card. Columns include activity date, action, amount, and note.

Note: it is assumed your site prefix is “wp_” (the default) however the table names may be slightly different depending on how your system is configured.

Change column order

Follow these instructions to customize the column order:

1. Download the free Code Snippets plugin https://wordpress.org/plugins/code-snippets/
2. Create a new Snippet with the following code:

function pw_bulk_edit_custom_column_order( $columns ) {
    // Specify the order that you want the first columns to be in.
    //
    // NOTE: The column names must match what is on the screen exactly!
    //
    $new_order = array(
        'Product name',
        'Type',
        'Status',
        'Sale end date',
        'Sale price',
        // Everything else will appear in the original order after these columns
    );

    // You don't need to change anything below.
    $modified_columns = $columns;
    $first = array_fill( 0, count( $new_order ), '' );

    for ( $x = 0; $x < count( $columns ); $x++ ) {
        $custom_index = array_search( $columns[$x]['name'], $new_order );
        if ( $custom_index !== false ) {
            $first[ $custom_index ] = $columns[$x];
            unset( $modified_columns[$x] );
        }
    }

    return array_merge( $first, $modified_columns );
}
add_filter( 'pwbe_product_columns', 'pw_bulk_edit_custom_column_order', 11 );

3. Change the column order as needed.

Note: If you are more comfortable with editing your functions.php you can do that instead of Code Snippets.

If the results show column names with "1" as the header value, then you haven't matched the column name with what is displayed.

Prevent a running balance (force gift card to always use entire balance)

Note: This customization requires the PW Gift Cards Pro version.

Follow these steps to make the gift card always use 100% of the remaining balance when redeemed, regardless of the order amount.

1. Download the free Code Snippets plugin: https://wordpress.org/plugins/code-snippets/
2. Create a Snippet with the following code:

function custom_pwgc_debit_amount( $debit_amount, $gift_card, $order_item_id, $line, $order ) {
    return ( $gift_card->get_balance() * -1 );
}
add_filter( 'pwgc_debit_amount', 'custom_pwgc_debit_amount', 10, 5 );

function custom_pwgc_remaining_balance( $balance, $gift_card ) {
    return 0;
}
add_filter( 'pwgc_remaining_balance_cart', 'custom_pwgc_remaining_balance', 10, 2 );
add_filter( 'pwgc_remaining_balance_checkout', 'custom_pwgc_remaining_balance', 10, 2 );

Note: If you are more comfortable with editing your functions.php you can do that instead of Code Snippets.

Add the “Check Balance” page to a menu (header, footer, sidebar, etc)

To add the Check Balance page to a custom menu, complete the following steps in your WordPress Admin Panel:

  1. Go to Appearance > Menus
  2. If you only have one menu, then skip this step! If you have more than one menu on your website, use the drop down beside “Select a menu to edit:” to begin editing the correct menu.
  3. There is a list of expandable sections on the left side of this page for things like Pages, Posts, and Blog Categories. You will see Pages in this list. If you click on it, it will expand to show you a list of Pages.
  4. Select the checkbox beside the Check Balance page and then press the Add to Menu button. This will insert it into the Menu Structure shown on the right side of the page.
  5. Drag and drop the newly added item into the menu positioning of your choice. If you wish for it to be submenu option, you can drag it slightly to the right under any existing menu option. It will appear indented.
  6. Press the blue Save Menu button

You should now see the Check Balance page in the menu on your website.

Add the gift card product to a menu (header, footer, sidebar, etc)

To add the gift card product page to a custom menu, complete the following steps in your WordPress Admin Panel:

  1. Go to Appearance > Menus
  2. In the upper right corner, click on Screen Options and ensure the “Products” box is checked
  3. If you only have one menu, then skip this step! If you have more than one menu on your website, use the drop down beside “Select a menu to edit:” to begin editing the correct menu.
  4. There is a list of expandable sections on the left side of this page for things like Pages, Posts, and Blog Categories. If you completed step 2 correctly, you will also see Products in this list. If you click on it, it will expand to show you a list of products.
  5. Select the checkbox beside the Gift Card product that you wish to add to the menu, then press the Add to Menu button. This will insert it into the Menu Structure shown on the right side of the page.
  6. Drag and drop the newly added item into the menu positioning of your choice. If you wish for it to be submenu option, you can drag them slightly to the right under any existing menu option. It will appear indented.
  7. Press the blue Save Menu button

You should now see the gift card product in the menu on your website.

Physical Gift Cards – Overview

If you will be selling physical gift cards along with eGift cards, you will have two products in your shop: one for eGift Cards and one for Physical Gift Cards. This is how Amazon does it.

The eGift card is what is created by default when you click on Pimwick Plugins -> PW Gift Cards -> Create Gift Card Product. It will generate a new gift card number when purchased.

To also sell physical gift cards, use the Copy button inside WooCommerce to make a copy of the eGift card product. Edit the new product and check the “Physical Gift Card” checkbox. The purchasing customer will be notified during checkout that the gift card will be mailed to the Shipping Address.

Generating a new number / Print on demand
When you check the “Physical Gift Card” checkbox, you can optionally specify an email address where the generated gift card number will be emailed when the gift card is purchased (default is the store owner’s email address). When an order is received for this product, you can print the gift card number to be mailed to the recipient.

Using Imported Gift Card Numbers
If you have imported gift card numbers, leave the email address field blank when you check the “Physical Gift Card” checkbox. When an order is received for this product, no new gift card number will be created and instead you will mail a physical gift card to the recipient from the list of existing imported numbers.

Generate and print in advance
If you need to create the gift cards for the vendor to print, follow this guide:
https://www.pimwick.com/pw-faq/physical-gift-cards-generate-and-export-for-printing-by-a-vendor/

For your physical cards, you may want to check out Duracard. Their site is easy to use and compatible with our plugin. We aren’t endorsed or affiliated with them but other PW Gift Card store owners have used them in the past.

Here is the direct link to their gift card product:
https://www.duracard.com/products/plastic-gift-cards

Redeeming in store
If you have customers redeeming gift cards in your store, learn more about that process here:
https://www.pimwick.com/pw-faq/redeeming-a-gift-card-in-a-physical-store-point-of-sale-pos/

Allow customer to choose from multiple Email Designs

Note: This feature is only available in the PW WooCommerce Gift Cards Pro version.

First, use the Email Designer to view and modify the available email designs on your site. Go to Pimwick Plugins > PW Gift Cards > Email Designer to configure the designs.

Then you can specify which Email Designs are available when a gift card is purchased by following these steps:

1. Log into your WordPress admin area.
2. Click on the Products menu on the left.
3. Edit the gift card product.
4. On the Gift Card tab, look for the “Email Design” section. Check the boxes for all designs that should be available for this product.
5. Click the blue “Update” button at the top right to save the changes.

Export Gift Cards

The PW Gift Cards Pro version includes a built in CSV Export:

Pimwick Plugins > PW Gift Cards > Import/Export > Download CSV File

The free version of the plugin does not have an export built into the plugin but you can export gift cards by following these steps:

1. Click on Pimwick Plugins -> PW Gift Cards
2. Leave the search field blank and click the “Search” button to display all gift cards.
3. Now you can select the table and copy/paste into Excel:

4. Delete the un-needed columns:

Exporting from SQL database

If you prefer to access the data directly in the database, there are two tables that the gift cards use for storing information:

wp_pimwick_gift_card
Stores the card number, expiration date, and active flag.

wp_pimwick_gift_card_activity
This table contains the transaction log to record loading and redeeming the card. Columns include activity date, action, amount, and note.

Note: it is assumed your site prefix is “wp_” (the default) however the table names may be slightly different depending on how your system is configured.

REST API

We also have a REST API if you want to programmatically access the gift card data. View the documentation here:
https://www.pimwick.com/pw-woocommerce-gift-cards-rest-api-documentation/

Check Balance page shortcode

When you click on Pimwick Plugins -> PW Gift Cards you should see a “Create Check Balance Page” button. This button will automatically create the Page for you with the appropriate Shortcode.

If you do not see this button that means the Page already exists with the Shortcode attached. Click on the Pages menu in the left to locate it.

For reference, here is the shortcode:

[pw_gift_cards_balance]

Hope this helps, let me know if you have any other questions!

Physical Gift Cards – Generate and export for printing by a vendor

Note: This feature requires the PW Gift Cards Pro version.

To export gift cards, follow these steps:

1. Click on Pimwick Plugins -> PW Gift Cards -> Create Gift Cards
2. Enter 250 for the number of cards, set the amount, and any additional fields then click on Create:

It will generate the cards and display them:

Now you can select the table and copy/paste into Excel:

Delete the un-needed columns:

You can now send this to the vendor for printing.

Changing Simple products to Variable products

To change from “Simple” to “Variable” you can follow these steps. Note that Variable products use the Attributes to generate the variations. You can use the bulk editor to add the attributes at the same time as changing the type so that it will automatically create the variations.

1. Open the bulk editor and filter the products you want to see.
2. Click on the Type column and then “Edit All Checked Products”

3. Change the type from Simple to Variable:

4. Click on Apply and you can preview the changes:

5. Next, add the Attributes that will be used for the variations. In this example we are using the “Color” attribute:

6. Finally, check the box that says “Automatically create Variations”:

7. If everything looks good, click on the “Save Changes” button. The Simple products will become Variable products and the Variations will be created based upon the Attributes.

By default, the new Variations will not have a price set. You can use the bulk editor to set the prices or if you would like to automatically copy over the Regular Price value from the Simple product to the Variations, you can create a snippet by following these steps:

1. Download the free Code Snippets plugin: https://wordpress.org/plugins/code-snippets/
2. Create a Snippet with the following code:

function custom_pwbe_variation_created( $variation_id, $product_id ) {
    $simple_product_price = get_post_meta( $product_id, '_regular_price', true );
    if ( empty( $simple_product_price ) ) {
        $simple_product_price = get_post_meta( $product_id, '_price', true );
    }

    if ( !empty( $simple_product_price ) ) {
        $variation = wc_get_product( $variation_id );
        $variation->set_regular_price( $simple_product_price );
        $variation->save();
    }
}
add_filter( 'pwbe_variation_created', 'custom_pwbe_variation_created', 10, 2 );

Note: If you prefer you can add this code to your child theme’s functions.php file instead of using Code Snippets.

Redeem or exclude for specific Products

To allow or prevent a gift card balance from paying for specific products, use the Redemption Restrictions feature.

Note: This feature is available in the PW Gift Cards Pro version only.

  1. Log into your WordPress admin area.
  2. Click on the Products menu on the left.
  3. Edit the PW Gift Card product.
  4. On the Gift Card tab, check the “Redemption restrictions?” box
  5. Set the Product restrictions accordingly.
  6. Click the blue Update button to save the changes.

Gift cards that are purchased with this product can only be redeemed for the products as configured.

Related articles
Redeem or exclude for specific categories
Redeem or exclude for products that are on sale

Redeem or exclude for specific Categories

To allow or prevent a gift card balance from paying for specific products, use the Redemption Restrictions feature.

Note: This feature is available in the PW Gift Cards Pro version only.

  1. Log into your WordPress admin area.
  2. Click on the Products menu on the left.
  3. Edit the PW Gift Card product.
  4. On the Gift Card tab, check the “Redemption restrictions?” box
  5. Set the Category restrictions accordingly.
  6. Click the blue Update button to save the changes.

Gift cards that are purchased with this product can only be redeemed for the products in the Categories as configured.

Related articles
Redeem or exclude for specific products
Redeem or exclude for products that are on sale

Redeem or exclude for products that are on sale

To allow or prevent a gift card balance from paying for specific products, use the pwgc_eligible_cart_amount hook.

Note: If you are more comfortable adding the code to your functions.php you can do that instead of using Code Snippets.

1. Download the free Code Snippets plugin: https://wordpress.org/plugins/code-snippets/
2. Create a new Snippet with the following code:

function on_sale_pwgc_eligible_cart_amount( $eligible_amount, $cart ) {

    foreach( WC()->cart->get_cart() as $cart_item ) {
        $valid_product = true;

        $product = $cart_item['data'];

        if ( is_a( $product, 'WC_Product' ) && $product->is_on_sale() ) {
            $valid_product = false;
        }

        if ( !$valid_product )  {
            $eligible_amount -= $cart_item['line_total'];
            $eligible_amount -= $cart_item['line_tax'];
        }
    }

    return max( 0, $eligible_amount );
}
add_filter( 'pwgc_eligible_cart_amount', 'on_sale_pwgc_eligible_cart_amount', 10, 2 );

Depending on your needs you can set the Eligible Product IDs to pick a few products that can be purchased, or set the Ineligible Product IDs to block out a few products that are not allowed to be purchased with a gift card.

The code will still allow the product(s) to be purchased, it just prevents the amounts from being paid by the gift card balance.

What to do if 2 gift cards are being created on orders paid via PayPal

If you notice two different gift cards being sent to the same recipient incorrectly, this most likely is caused by an incorrect PayPal configuration setting.

This happens for orders that are paid by PayPal.

Check the Order Notes section and see if there are two references to the order being marked Complete. You should also see something referencing IPN and PDT as separate line items.

What is happening is the payment confirmation from PayPal is being sent to your site using two separate methods, at nearly the exact same time. This means the order gets processed two times.

The problem is known by WooCommerce and it causes other problems like incorrect stock quantity deductions, duplicate order notifications, etc.

The solution is to clear the “PayPal Identity Token” field in the PayPal gateway settings:

WooCommerce -> Settings -> Payments -> PayPal -> PayPal identity token

This is an unfixed bug in WooCommerce discussed in different places:

https://github.com/woocommerce/woocommerce/issues/13963
https://wordpress.org/support/topic/help-with-duplicate-new-order-emails/
https://wordpress.org/support/topic/woocommerce-stock-reducing-twice-after-processing-and-completed/

Hide the Redeem button in the gift card email

You can hide the Redeem button in the gift card email from within the Email Designer. Open the Email Designer by going to Pimwick Plugins -> PW Gift Cards -> Email Designer.

Scroll down to the “Redeem Button Visibility” option and set it to “Hidden” and then click “Save Design”.

Do not allow gift cards to be redeemed online

Follow these steps if you do not want gift cards to be redeemed online. For instance, if you only want them to be redeemed in your physical store.

1. Download the free Code Snippets plugin: https://wordpress.org/plugins/code-snippets/
2. Create a new Snippet with the following code:

function custom_pwgc_git_card_can_be_redeemed( $can_be_redeemed, $gift_card ) {
    return 'Gift cards cannot be used for this order.';
}
add_filter( 'pwgc_gift_card_can_be_redeemed', 'custom_pwgc_git_card_can_be_redeemed', 10, 2 );

You can also remove the Gift Card input field from the Cart and Checkout pages by going to:

Pimwick Plugins -> PW Gift Cards -> Settings -> Redeem Location

Custom Taxonomies

Follow these instructions to add the custom taxonomies to the Bulk Editor:

1. Download the free Code Snippets plugin: https://wordpress.org/plugins/code-snippets/
2. Create a Snippet with the following code (adjust to match your taxonomies):

$GLOBALS['pw_bulk_edit_custom_taxonomies'] = array(
    array( 'slug' => 'brand', 'name' => 'Brands', 'plural' => 'brands' ),
    array( 'slug' => 'collection', 'name' => 'Collections', 'plural' => 'collections' ),
    array( 'slug' => 'print_number', 'name' => 'Print Numbers', 'plural' => 'print_numbers' ),
    array( 'slug' => 'schedule', 'name' => 'Schedules', 'plural' => 'schedules' ),
);

Replace the values with your actual custom taxonomies.

Limit the number of gift cards that can be redeemed per order

1. Download the free Code Snippets plugin: https://wordpress.org/plugins/code-snippets/
2. Create a new Snippet with the following code:

function custom_pwgc_git_card_can_be_redeemed( $message, $gift_card ) {
    $session_data = (array) WC()->session->get( PWGC_SESSION_KEY );
    if ( isset( $session_data['gift_cards'] ) && count( $session_data['gift_cards'] ) >= 1 ) {
        $message = 'Only one gift card can be redeemed per order.';
    }

    return $message;
}
add_filter( 'pwgc_gift_card_can_be_redeemed', 'custom_pwgc_git_card_can_be_redeemed', 10, 2 );

Change the “1” above to the limit you want to enforce.

You can also remove the Gift Card input field from the Cart and Checkout pages by going to Pimwick Plugins -> PW Gift Cards -> Settings -> Redeem Location.

Change gift card product image

The gift card product image that is shown in the store can be edited using the following steps:

1. Log into your WordPress admin area.
2. Click on the Products menu in the left
3. Click on the gift card product to edit it
4. Click on the image icon in the right column to change the image.

Redeeming a gift card in a physical store / Point-of-Sale (POS)

Note: this requires the PW Gift Cards Pro version.

You can redeem a Gift Card in store using the following process:

1. A transaction is started in your Point of Sale (POS) system.
2. Gift card is presented to the cashier by the customer.
3. Cashier clicks on Pimwick Plugins -> PW Gift Cards -> Types in the number (or usually first 4-5 digits will find it in search results).
4. Click on Adjust Balance button and enter the amount being redeemed for the purchase. Optionally enter the POS receipt number.
5. Return to the POS and adjust the total by the amount redeemed on the gift card.

Alternatively, there is a setting you can enable to put a “Debit Gift Card” button on the “Check Balance” page. That way a cashier in the physical shop would not need to log in to debit the gift card that was used in the store.

Click on Pimwick Plugins -> PW Gift Cards -> Settings -> Check the “Allow Manual Debit” checkbox. Now you can visit your “Check Balance” page and see the button to debit the supplied gift card.

Quick Start Guide

Thank you for reaching out. We are currently in the process of updating our plugin documentation, it is a work in progress. You can find some tips on our Support page on our website, www.pimwick.com, which may be helpful.

To get started you can follow these steps to create the PW Gift Card product in your catalog:

1. Log into your WordPress admin area.
2. Click on Pimwick Plugins -> PW Gift Cards.
3. Click the “Create Gift Card Product” button.
4. Now that the product has been created, it is available for sale in your shop. You can edit properties of the gift card by clicking the Products menu on the left.

When redeeming a gift card, apply to Subtotal (before Shipping, Tax, Fees, etc) instead of Total

By default, the gift card works like cash and applies to the Total (after taxes, shipping, fees, etc). The customer can use it to pay for the Total.

If you want the gift card to work like a Coupon (apply before taxes, shipping, fees, etc) then this needs to apply to the Subtotal instead.

Follow these steps to apply the gift card to the Subtotal before shipping and tax instead of the Total:

1. Download the free Code Snippets plugin: https://wordpress.org/plugins/code-snippets/
2. Create a new snippet with the following code:

function custom_pwgc_eligible_cart_amount( $eligible_amount, $cart ) {
    $eligible_amount = $cart->get_subtotal();

    return $eligible_amount;
}
add_filter( 'pwgc_eligible_cart_amount', 'custom_pwgc_eligible_cart_amount', 10, 2 );

To / From / Message fields do not appear

Only the “To” field is missing?
If you do not see the “To” field but the “From” and “Message fields are available, the gift card might be configured as a Physical Gift Card.

1. Log into your WordPress admin area.
2. Click on the Products menu on the left.
3. Edit the gift card product.
4. On the Gift Card tab, locate the “Physical Gift Card” checkbox and uncheck it.
5. Click the blue Update button at the top right corner.

All fields are missing!
If you do not see the To, From, and Message fields at all, this is likely something related to your Theme. There are a couple of things to try but if they don’t work you will need to reach out to your Theme developer to find out why the fields do not appear.

First, go to Pimwick Plugins -> PW Gift Cards -> Settings -> Check the box “Apply Fix For Missing Fields” and click “Save Changes”.

If that doesn’t work, uncheck that box and then try this:

1. Download the wp-config.php from your FTP server.
2. Keep a backup of wp-config.php in case there are problems.
3. Edit wp-config.php and scroll to the end and add the following bit of code:

Scroll towards the bottom, and before the line that says “Happy blogging.” add this code ABOVE that line (change the values as needed):

define( 'PWGC_BEFORE_ADD_TO_CART_QUANTITY_FIX', true );

/* That's all, stop editing! Happy blogging. */

4. Save the wp-config.php file and re-upload it to your server.

If the fields still do not appear, you will need to contact your theme developer about having the woocommerce_before_add_to_cart_quantity hook called for the products.

Free Shipping – Limit by country

If you want to limit free shipping to specific countries only, you can use the pwbf_free_shipping_is_available hook.

For example, to limit free shipping for only US addresses, follow these steps:

Note: if you prefer to add the code to your functions.php you can do that instead of using Code Snippets.

1. Download the free Code Snippets plugin: https://wordpress.org/plugins/code-snippets/
2. Create a Snippet with the following code (Note: If you are more comfortable with editing your functions.php you can do that instead of Code Snippets.):

function custom_pwbf_free_shipping_is_available( $is_available, $black_friday ) {
    if ( $is_available) {
        $shipping_country = WC()->customer->get_shipping_country();

        // Perform your country verification here.
        if ( $shipping_country != 'US' ) {
            $is_available = false;
        }
    }

    return $is_available;
}
add_filter( 'pwbf_free_shipping_is_available', 'custom_pwbf_free_shipping_is_available', 10, 2 );

Can I import gift cards with a zero balance?

Yes, you can import with the balance being zero in the CSV file (or you can leave off the Balance column and just import the number itself).

When you sell the physical card, you can search for it and click the “Adjust Balance” button to add the purchased amount to the balance of the card.

Prevent Attributes from appearing in the bulk editor

The PW Bulk Edit Pro plugin will load in all available Attributes for filtering and assigning to products. Depending on your WooCommerce store you might have a lot of attributes and it will feel cluttered in the bulk editor.

To prevent any Attributes from being available in the Bulk Editor, follow these steps:

1. Install the free Code Snippets plugin (https://wordpress.org/plugins/code-snippets/)
2. Create a new Snippet with the following code:

function custom_pwbe_attributes( $attributes ) {
    $attributes = array();
    return $attributes;
}
add_filter( 'pwbe_attributes', 'custom_pwbe_attributes' );

This will prevent any attributes from being shown. If you would like to show only specific attributes, change the code to this:

function custom_pwbe_attributes( $attributes ) {
    $attributes = array(
        array( 'slug' => 'pa_color', 'name' => 'Color' ),
        array( 'slug' => 'pa_size', 'name' => 'Size' ),
    );
    return $attributes;
}
add_filter( 'pwbe_attributes', 'custom_pwbe_attributes' );

Specify the attribute slug and name where appropriate. You can find the slug inside your WordPress Admin area under Products -> Attributes (just prefix with “pa_”)

500 Internal Server Error

A 500 error means that something on the server is throwing an error. This could be a conflict with another plugin or something else. We need to examine the log file from the server to find out more.

Could you perform the following steps please:

1. Log into your FTP site and edit wp-config.php
2. Set the following values (add the lines if they don’t exist):

    define( 'WP_DEBUG', true );
    define( 'WP_DEBUG_LOG', true );
    define( 'WP_DEBUG_DISPLAY', false );
    @ini_set( 'display_errors', 0 );

3. Return to the site and trigger the error again.
4. Now go back to FTP and send me the file /wp-content/debug.log
5. Return to wp-config.php and set DEBUG back to false (reverting the changes made in Step 2)

If you aren’t comfortable with performing the steps above, contact your website host and they should be able to assist you in locating this log file.

Delete gift cards from the database

PW Gift Cards Pro has a Permanently Delete button available on the deleted gift card from the dashboard. If you are not able to upgrade and you are comfortable with running SQL scripts, you can delete a gift card by using the following script:

DELETE FROM wp_pimwick_gift_card_activity WHERE pimwick_gift_card_id = (SELECT pimwick_gift_card_id FROM wp_pimwick_gift_card WHERE
number = '1234-5678-9012-3456');
DELETE FROM wp_pimwick_gift_card WHERE
number = '1234-5678-9012-3456';


To delete all gift cards in the database you can use phpMyAdmin to run the following query. Replace the table name with your actual table names, “wp_” is the default prefix and should be fine unless your site is using multisite:

DELETE FROM wp_pimwick_gift_card_activity;
DELETE FROM wp_pimwick_gift_card;

This will delete ALL gift cards, if you don’t have any valid gift cards then this will work for you. If you need assistance running this script you should contact your website host.

Scheduled gift cards

The gift cards are scheduled to be delivered after midnight using the WordPress Cron system.

You can find out more about the WordPress Cron system here:
https://developer.wordpress.org/plugins/cron/

With that said, ensure that the Order status is “Complete”. Gift Card numbers are generated and emailed only when the order status is Complete.

If the status is Complete, check your configured timezone by clicking on Settings -> General -> Timezone.

Want to change the schedule time?

Change delivery time for scheduled gift cards

To view the scheduled times for your WP Cron events, we recommend installing the free WP Crontrol plugin:

https://wordpress.org/plugins/wp-crontrol/

After installing WP Crontrol, go to Tools > Cron Events > Search for “pw_gift_cards_delivery” and see the schedule.

Perform the following steps to change the schedule start time for this job.

1. Download the free Code Snippets plugin: https://wordpress.org/plugins/code-snippets/
2. Create a new Snippet with the following code (or add to your Child Theme’s functions.php if you prefer):

function custom_pwgc_scheduled_email_start_time( $timestamp ) {
    //
    // By default, gift cards are scheduled for midnight based on the timezone
    // configured in WordPress found under Settings -> General -> Timezone.
    //
    // For example, to run at 3pm each day:
    //
    $timestamp = pwgc_strtotime( 'tomorrow 3:00pm' );

    return $timestamp;
}
add_filter( 'pwgc_scheduled_email_start_time', 'custom_pwgc_scheduled_email_start_time' );

3. IMPORTANT – The job is already scheduled so you must deactivate the plugin to clear the job. Click on Plugins -> Installed Plugins -> Scroll down to PW WooCommerce Gift Cards and click “Deactivate”.
4. After it has been deactivated, click on “Activate” to start it back up and schedule the job using your new settings.

For more information about this timestamp, see the WordPress Codex: https://developer.wordpress.org/reference/functions/wp_schedule_event/


Discount the gift card price (coupons, sales, etc)

When a gift card is purchased, the initial balance will be for the full amount regardless of the price paid for the gift card. This means you can use the built in WooCommerce Coupons to offer a discount on a gift card purchase or you can look under the Variations tab to set the Sale Price for the fixed amounts.

Setting the Sale Price
  1. Log into your WordPress admin area.
  2. Click on the Products menu on the left.
  3. Edit the gift card product.
  4. Click on the Variations tab.
  5. Expand the amount and set the Sale Price.
  6. Click the blue Update button at the top right.
Using a Coupon
  1. Log into your WordPress admin area.
  2. Click on Marketing > Coupons (or WooCommerce > Coupons for older versions of WC)
  3. Create a coupon with the desired settings.
  4. Optionally restrict the Coupon to only the Gift Card product.
Bonus Gift Cards

The PW Gift Cards Pro version allows you to offer a Bonus gift card for purchasing a gift card. For example, “Buy a $50 gift card, get a $5 bonus gift card free”. See the Bonus Gift Cards FAQ for more details.

Plugins

You may also be interested in our On Sale! or Black Friday plugins which will allow you to put the gift card on sale without requiring a coupon code to be entered. You can find out more information about the plugins here:

PW WooCommerce On Sale! Pro

PW WooCommerce Black Friday / Cyber Monday Pro

Do not allow coupons when redeeming a gift card

You can prevent any coupon from being used if there is a Gift Card applied to the cart by taking the following steps:

1. Download the free Code Snippets plugin: https://wordpress.org/plugins/code-snippets/
2. Create a Snippet with the following code (Note: If you are more comfortable with editing your functions.php you can do that instead of Code Snippets.):

function pw_gift_card_prevent_coupons( $is_valid, $coupon ) {
    $gift_cards_applied = false;

    if ( defined( 'PWGC_SESSION_KEY' ) ) {
        $session_data = (array) WC()->session->get( PWGC_SESSION_KEY );
        if ( isset( $session_data['gift_cards'] ) && count( $session_data['gift_cards'] ) > 0 ) {
            $gift_cards_applied = true;
        }
    }

    if ( $gift_cards_applied ) {
        // Do not allow any coupon if there is a gift card applied.
        $is_valid = false;
    }

    return $is_valid;
}
add_filter( 'woocommerce_coupon_is_valid_for_cart', 'pw_gift_card_prevent_coupons', 10, 2 );
add_filter( 'woocommerce_coupon_is_valid_for_product', 'pw_gift_card_prevent_coupons', 10, 2 );

Adjusting the maximum character limit for message

You can adjust the maximum length of the message text. The default is 500. To change it, follow these steps:

1. Log into your FTP site and edit wp-config.php
2. Edit wp-config.php and scroll to the end and add the following bit of code:

Scroll towards the bottom, and before the line that says “Happy blogging.” add this code ABOVE that line:

define( 'PWGC_MAX_MESSAGE_CHARACTERS', 500 );

/* That's all, stop editing! Happy blogging. */

3. Save the wp-config.php file and re-upload it to your server.

Let me know if that does the trick!

Adding a Bonus Gift Card

You can configure the bonus cards when you edit the gift card product inside WooCommerce.

1. Log into your WordPress Admin area.
2. Click on the Products menu on the left.
3. Edit the PW Gift Card product
4. On the “Gift Card” tab, check the box that says “Enable Bonus Gift Cards”

At this point you can click “Add a bonus amount” to specify the gift card amount that will trigger the bonus, as well as the bonus amount itself. For example, you could offer a $5 bonus gift card for every $25 in gift cards purchased.

The Cumulative Bonus option means that the customer can buy an combination of gift cards to trigger the bonus. Using my previous example, the customer could buy a $10 gift card and a $15 gift card to receive the $5 bonus. With the Cumulative Bonus box unchecked, the customer will get a $5 bonus only for purchasing a $25 gift card exactly. This way you can offer different bonus amounts ($5 for $25, $15 for $50, etc)

Under the “Who will receive the bonus gift card” you will specify the recipient for the bonus.

Change the amount on the gift card email

Note: this requires the PW Gift Cards Pro version 1.343 or later. If you have an earlier version or the free version, you can override the email template manually.

To change the amount that is displayed on the gift card email, follow these steps:

1. Download the free Code Snippets plugin: https://wordpress.org/plugins/code-snippets/
2. Create a new Snippet with the following code (or add this to your functions.php file if you are more comfortable with that instead):

function custom_pwgc_email_template_amount( $amount, $item_data ) {
    switch ( $item_data->amount ) {
        case '100':
            $amount = 'Gold';
        break;

        case '500':
            $amount = 'Diamond';
        break;

        case '1000':
            $amount = 'Platinum';
        break;
    }

    return $amount;
}
add_filter( 'pwgc_email_template_amount', 'custom_pwgc_email_template_amount', 10, 2 );

To change the amount that is shown in the dropdown menu when purchasing the gift card, see this guide:
https://www.pimwick.com/pw-faq/change-the-amount-labels/

Rename the amount labels on the product page (Variations drop-down menu)

WooCommerce has a hook that you can use to change labels for the dropdown menu. It is called woocommerce_variation_option_name

Follow these steps:

1. Download the free Code Snippets plugin: https://wordpress.org/plugins/code-snippets/
2. Create a new Snippet with the following code:

function pw_gift_cards_woocommerce_variation_option_name( $name, $option_name, $attribute_name, $product_object ) {
    if ( is_a( $product_object, 'WC_Product_PW_Gift_Card' ) ) {
        $map = array(
            '$100.00' => 'Gold',
            '$500.00' => 'Diamond',
            '$1,000.00' => 'Platinum',
        );

        if ( isset( $map[ html_entity_decode( $name ) ] ) ) {
            return $map[ html_entity_decode( $name ) ];
        }
    }

    return $name;
}
add_filter( 'woocommerce_variation_option_name', 'pw_gift_cards_woocommerce_variation_option_name', 20, 4 );

If you want to rename the “Other Amount” option, follow the instructions in this guide:
https://www.pimwick.com/pw-faq/renaming-the-other-amount-option/

To change the amount that is displayed in the gift card email, see this guide:
https://www.pimwick.com/pw-faq/change-the-amount-on-the-gift-card-email/

Show the Amount attributes

To show the Amount attributes on the product page, follow these steps:

1. Download the free Code Snippets plugin: https://wordpress.org/plugins/code-snippets/
2. Create a Snippet with the following code:

add_filter( 'pw_gift_cards_amount_attribute_visible_on_product_page', '__return_true' );

You can optionally add this to your functions.php if you’re more familiar with that process instead.

After adding the code, edit the PW Gift Card product and click the blue “Update” button. You don’t need to make any changes.

1. Log into your WordPress Admin area.
2. Click on the Products menu.
3. Edit the PW Gift Card product.
4. Click the blue Update button without making any changes.

Upgrade the plugin

To get the update:

1. Log into your WordPress Admin area.
2. Click on Plugins -> Installed plugins.
3. Scroll down to PW WooCommerce On Sale! and click “Check for updates.”
4. The page will refresh, then scroll back down and click on “Update.”

Upgrade the plugin

To get the update:

1. Log into your WordPress Admin area.
2. Click on Plugins -> Installed plugins.
3. Scroll down to PW WooCommerce Let’s Export! and click “Check for updates.”
4. The page will refresh, then scroll back down and click on “Update.”
5. Important: Since there is a new field, after the update has finished updating click on “Deactivate” and then “Activate” to ensure that the new field appears.

Upgrade the plugin

To get the update:

1. Log into your WordPress Admin area.
2. Click on Plugins -> Installed plugins.
3. Scroll down to PW WooCommerce Coupons Plus and click “Check for updates.”
4. The page will refresh, then scroll back down and click on “Update.”

Discount highest priced first

By default, the BOGO discount applies to the lowest-priced item. If you want to flip that and apply the discount to the highest-priced item instead, follow these steps:

1. Download the wp-config.php from your FTP server.
2. Keep a backup of wp-config.php in case there are problems.
3. Edit wp-config.php and scroll to the end and add the following bit of code:

Scroll towards the bottom, and before the line that says “Happy blogging.” add this code ABOVE that line:

define( 'PW_BOGO_DISCOUNT_HIGHEST_PRICED_FIRST', true );

/* That's all, stop editing! Happy blogging. */

4. Save the wp-config.php file and re-upload it to your server.

If you have any problems, replace wp-config.php with your backup file.

Role / Privilege

By default the plugin can be administered by anyone with the “Shop Manager” access or higher. You can change this by taking the following steps:

1. Download the wp-config.php from your FTP server.
2. Keep a backup of wp-config.php in case there are problems.
3. Edit wp-config.php and scroll to the end and add the following bit of code:

Scroll towards the bottom, and before the line that says “Happy blogging.” add this code ABOVE that line:

define( 'PW_BLACK_FRIDAY_REQUIRES_PRIVILEGE', 'administrator' );

/* That's all, stop editing! Happy blogging. */

4. Save the wp-config.php file and re-upload it to your server.

If you have any problems, replace wp-config.php with your backup file.

Custom Affiliate URL

By default, the URL is filled in with whatever you have configured as your “Shop Page” inside WooCommerce settings.

There is a hook available to change the landing URL to something other than the Shop page. Follow these instructions:

1. Download the free Code Snippets plugin: https://wordpress.org/plugins/code-snippets/
2. Create a Snippet with the following code (or you can put this in your functions.php if you prefer):

function custom_pw_affiliates_shop_page_url( $url ) {
    // Change this to suit your needs:
    return 'https://www.yoursite.com';
}
add_filter( 'pw_affiliates_shop_page_url', 'custom_pw_affiliates_shop_page_url' );


SERVER ERROR Error while saving products (Save Batch Size)

If you receive the following message while saving products:

SERVER ERROR Error while saving products

The server is timing out before it finishes saving the batch. Instead of saving all records at the same time, we batch them into 25 so that servers can finish processing them before moving on to the next batch.

On some hosts, 25 is still too high and the batches need to be smaller so they can complete successfully before the web browser gives up and stops waiting (throwing an error).

Adjust the value until you find the sweet spot where it doesn’t timeout. A batch size of 1 will save each field, one after the other.

To adjust the batch size perform the following steps:

PW Bulk Edit Pro users:
1. Log into your WordPress admin area.
2. Click on WooCommerce > Settings > PW Bulk Edit
3. Set the “Save Batch Size” value.
4. Click on “Save Changes”

PW Bulk Edit free version:
1. Log into your FTP site and edit wp-config.php
2. Edit wp-config.php and scroll to the end and add the following bit of code:

Scroll towards the bottom, and before the line that says “Happy blogging.” add this code ABOVE that line:

define( 'PWBE_SAVE_BATCH_SIZE', 5 );

/* That's all, stop editing! Happy blogging. */

3. Save the wp-config.php file and re-upload it to your server.

How to create Variations

To create new Variations, you need to add new Attributes to the parent (Variable) product. There will be a checkbox before saving where you can automatically create the variations.

For this example we will use the “Size” attribute:

1. Filter your products using the Bulk Editor.
2. Click on the Size Attributes column and then Edit All Checked Products.

3. Click on “Add To Size Attributes” and enter the attributes you want to add. Note: if you want to create a new attribute that doesn’t already exist, go to the WooCommerce Attributes setup area by clicking on Products -> Attributes in the left hand admin menu.

4. After you have added the attributes, a new checkbox will appear. Check the “Automatically create Variations from Attributes added to Variable Products” checkbox and then click on Save Products. This will generate new Variation combinations for the new Attribute.

Template – Check Balance page

This requires the PW WooCommerce Gift Cards Pro version.

If you just want to change the logo image, see this guide:
https://www.pimwick.com/pw-faq/check-balance-page-how-to-change-the-image/

We use the built in WooCommerce template system. To override the look of the Check Balance page

Copy this file:

/wp-content/plugins/pw-woocommerce-gift-cards/templates/woocommerce/pw-gift-cards/balance.php

To here:

/wp-content/themes/<your_theme>/woocommerce/pw-gift-cards/balance.php

Create the sub-folders if necessary. Once the file is in your theme folder, open it up in a text editor and make any changes to the HTML and CSS.

Activity Table

If you wish to change the results shown in the grid

Copy this file:

/wp-content/plugins/pw-woocommerce-gift-cards/templates/woocommerce/pw-gift-cards/balance-activity.php

To here:

/wp-content/themes/<your_theme>/woocommerce/pw-gift-cards/balance-activity.php

Create the sub-folders if necessary. Once the file is in your theme folder, open it up in a text editor and make any changes to the HTML and CSS.

Template – Apply Gift Card

You can change the location of this field from the settings page. Click on Pimwick Plugins -> PW Gift Cards -> Settings and set the “Redeem Location” options.

If you want more control we use the built in WooCommerce template system. To override the look of the Apply Gift Card area, copy the template file to your theme directory.

The template files are here:

/wp-content/plugins/pw-woocommerce-gift-cards/templates/woocommerce/

When you find the template file you want to override, copy it to your theme directory:

/wp-content/themes/<your_theme>/woocommerce/

Note: make sure that you copy any sub-directories as well!

Once the file is in your theme folder, open it up in a text editor and make any changes to the HTML and CSS.

There are four template files for the “Apply Gift Card” area depending on the settings chosen here:
Pimwick Plugins -> PW Gift Cards -> Settings -> Redeem Location

For the “Cart” page:

/pw-woocommerce-gift-cards/templates/woocommerce/cart/apply-gift-card-after-cart-contents.php
/pw-woocommerce-gift-cards/templates/woocommerce/cart/apply-gift-card.php

For the “Checkout” page:

/pw-woocommerce-gift-cards/templates/woocommerce/checkout/coupon-area-pw-gift-card.php
/pw-woocommerce-gift-cards/templates/woocommerce/checkout/payment-method-pw-gift-card.php

Template – To / From / Message fields

We use the built in WooCommerce template system so that you can fully customize these fields.

To override the HTML for these fields, copy this file:

/wp-content/plugins/pw-woocommerce-gift-cards/templates/woocommerce/single-product/add-to-cart/pw-gift-card-before-add-to-cart-quantity.php

To here (create any missing subfolders):

/wp-content/themes/<your_theme>/woocommerce/single-product/add-to-cart/pw-gift-card-before-add-to-cart-quantity.php

Once the file is in your theme folder, open it up in a text editor and make any changes.

You can find out more about customization here: https://docs.woocommerce.com/document/configuring-woocommerce-settings/#section-21

Template – Gift Card Email

You can fully customize the gift card email to suit your needs. We use the built in WooCommerce email template system. To override the email follow these steps:

1. Log into your WordPress admin area.
2. Click on WooCommerce -> Settings -> Emails -> PW Gift Card Email
3. Under the “HTML Template” section, click “Copy file to theme”
4. Once the file is in your theme folder, open it up in a text editor and make any changes. You can change colors, wording, etc.

If you have trouble with Step 3, you can manually copy this file:

/wp-content/plugins/pw-woocommerce-gift-cards/templates/woocommerce/emails/customer-pw-gift-card.php

To here (you may need to create the subfolders if they do not exist in your theme folder):

/wp-content/themes/<your-active-theme>/woocommerce/emails/customer-pw-gift-card.php

You can find out more about customization here:
https://docs.woocommerce.com/document/configuring-woocommerce-settings/#section-21

Here are some examples of adding information to the template.

Adding the Product Title
<div class="pwgc-email-section">
    <?php
        $product = property_exists( $item_data, 'product' ) && is_a( $item_data->product, 'WC_Product' ) ? $item_data->product : pwgc_get_gift_card_product();
        echo 'Product: ' . esc_html( $product->get_title() );
    ?>
</div>
Product description (parent Variable product)
<?php
    if ( property_exists( $item_data, 'parent_product' ) && is_a( $item_data->parent_product, 'WC_Product_PW_Gift_Card' ) ) {
        echo $item_data->parent_product->get_description();
    }
?>
Variation description
<?php
    if ( property_exists( $item_data, 'product' ) && is_a( $item_data->product, 'WC_Product' ) ) {
        echo $item_data->product->get_description();
    }
?>
Order Data
<?php
    if ( !empty( $item_data->order ) ) {
        ?>
        <div class="pwgc-section">
            <div class="pwgc-label">Order Number</div>
            <div class="pwgc-expiration-date"><?php echo $item_data->order->get_order_number(); ?></div>
        </div>

        <div class="pwgc-section">
            <div class="pwgc-label">Order Date</div>
            <div class="pwgc-expiration-date"><?php echo $item_data->order->get_date_created(); ?></div>
        </div>
        <?php
    }
?>
Product Image (main product)
<?php
    if ( property_exists( $item_data, 'parent_product' ) && is_a( $item_data->parent_product, 'WC_Product' ) ) {
        $image = wp_get_attachment_image_src( get_post_thumbnail_id( $item_data->parent_product->get_id() ), 'single-post-thumbnail' );
        if ($image) {
            ?>
            <img src="<?php echo $image[0]; ?>">
            <?php
        }
    }
?>
Variation Image
<?php
    if ( property_exists( $item_data, 'product' ) && is_a( $item_data->product, 'WC_Product' ) ) {
        $image = wp_get_attachment_image_src( get_post_thumbnail_id( $item_data->product->get_id() ), 'single-post-thumbnail' );
        if ($image) {
            ?>
            <img src="<?php echo $image[0]; ?>">
            <?php
        }
    }
?>
Recipient Email Address
<?php
    if ( !empty( $email->recipient ) ) {
        echo $email->recipient;
    }
?>
Skip to content